Have you ever struggled to put a window screen back on from inside your home? It might seem tricky at first, but with the right steps, you can do it quickly and easily. First, ensure that your window screen is clean and free of any debris. Next, you'll want to align the screen with the window frame, making sure it fits snugly. Once you understand how to install a window screen, it becomes a straightforward task that can enhance your home's ventilation and keep out unwanted pests.
Imagine saving time and avoiding the hassle of going outside, especially when the weather isn’t great. In this guide, you’ll learn simple, clear instructions that make the whole process smooth and stress-free. Keep reading, and you’ll find out how to get your window screen back in place without any frustration. With just a few easy steps, you can learn how to remove window screens efficiently and without damage. This guide will ensure that even beginners can follow along and complete the task. By the end, you'll feel empowered to tackle any window screen project that comes your way. With the right techniques, you’ll discover just how easy it can be to manage your window screens from the comfort of your home. This guide will also provide you with tips on how to remove window screens without damaging them, ensuring your windows remain in great shape. Say goodbye to those annoying moments of struggle and hello to a more efficient way to enjoy fresh air and natural light!
Credit: www.familyhandyman.com
Tools And Materials Needed
Putting a window screen back on from the inside needs the right tools and materials. Using proper items makes the job easier and faster.
Before starting, gather everything you need. This saves time and helps avoid mistakes.
Essential Tools
You need a few basic tools to fix the screen. These tools help you remove and secure the screen properly.
- Flathead screwdriver to remove or adjust frame clips
- Utility knife for trimming excess screen material
- Screen rolling tool or spline roller to press the screen into the frame
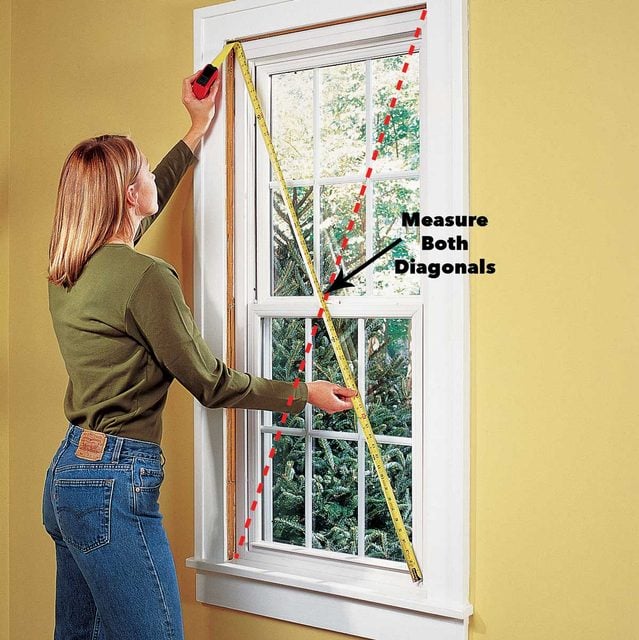
- Measuring tape to check the screen size
- Work gloves to protect your hands
Choosing The Right Screen
Selecting the right type of screen is important for durability and appearance. Different materials suit different needs.
| Screen Type | Best Use | Durability |
| Fiberglass | General home use | Moderate |
| Aluminum | High durability and pets | High |
| Pet-Resistant | Homes with pets | Very High |
| Solar Screen | Blocks sunlight and heat | High |
Preparing The Window Frame
Putting a window screen back from inside is easy. First, prepare the window frame properly.
This guide will help you clean and check your window frame. Follow the steps for a smooth process.
Cleaning The Frame
Cleaning the window frame is important. Dust and dirt can block the screen.
Use a damp cloth to wipe the frame. Make sure to clean all corners and edges.
- Remove loose dirt with a brush
- Use a mild soap solution for stubborn spots
- Dry the frame completely before proceeding
Checking For Damage
Check the window frame for any damage. Look for cracks or bends.
If you find any issues, fix them first. This ensures the screen fits properly.
- Inspect for broken parts
- Look for any loose screws
- Repair or replace damaged areas
Positioning The Screen
Putting a window screen back on from inside needs care to fit it right. You must line up the screen so it stays secure and blocks insects well.
Knowing how to position the screen helps avoid damage and makes the job easier. Focus on aligning and adjusting for your window frame type.
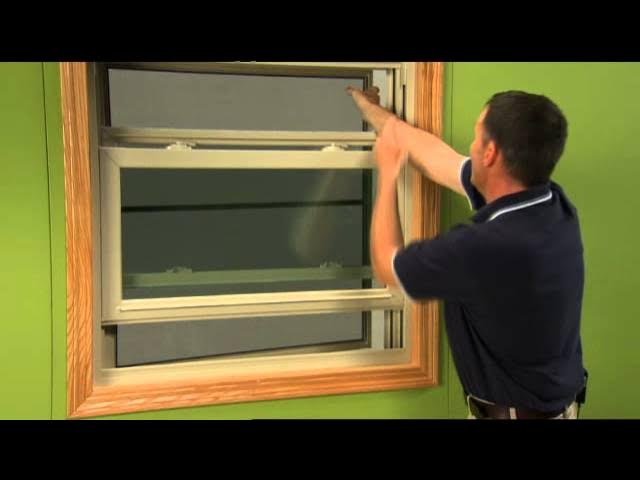
Aligning The Screen Properly
Start by holding the screen near the window. Check if the screen edges match the window frame edges exactly. The screen must fit flush with the frame to avoid gaps.
- Hold the screen at an angle to fit into the top part of the frame first.
- Gently press the screen inward and downward to fit the bottom edge.
- Make sure the screen mesh stays tight and does not sag.
- Check all sides for even contact with the frame.
- Use your fingers to press the screen frame into the window channel.
Handling Different Frame Types
Window frames come in many styles. Some have grooves, clips, or magnetic strips. It is important to know your frame type before placing the screen back.
| Frame Type | How to Position Screen |
| Grooved Frame | Slide screen edges into grooves carefully. Press firmly to lock in place. |
| Clip Frame | Align screen with clips. Push screen until clips snap over the frame. |
| Magnetic Frame | Place screen close to frame. Magnets will hold the screen securely. |
| Flat Frame | Rest screen evenly. Use push pins or fasteners to hold screen in place. |
Securing The Screen
Putting a window screen back on from inside needs careful securing. This keeps the screen tight and safe from falling.
There are different ways to secure the screen. Two common ways are using spline and rollers or reattaching clips and fasteners.
Using Spline And Rollers
Spline is a thin rubber strip that holds the screen in the frame. Rollers help move the screen smoothly inside the window track.
To use spline and rollers, place the screen in the frame first. Then press the spline into the groove around the screen edge. Use a roller tool to push the spline in tightly. This keeps the screen firm and secure.
- Fit the screen into the frame
- Press spline into the groove around the screen
- Use a roller to push spline evenly and tightly
- Check the screen for a tight fit
Reattaching Clips Or Fasteners
Some window screens use clips or fasteners to stay in place. These parts snap or screw the screen to the frame.
To reattach, line up the screen with the window frame. Press the clips or fasteners back into their slots. Make sure each clip clicks or is tight. This stops the screen from moving or falling.
- Align screen with window frame
- Attach clips or fasteners to slots
- Push clips until they snap in place
- Check all clips are secure
Final Checks And Adjustments
After putting the window screen back on from inside, it is important to check everything carefully. This helps make sure the screen fits well and works properly.
Taking time for final checks can prevent damage and keep bugs out of your home.
Ensuring A Tight Fit
Check that the screen sits firmly in the window frame. A tight fit stops the screen from falling out or letting bugs inside.
Look for any gaps or loose edges. Press the screen gently to see if it moves or shifts.
- Make sure the screen frame matches the window frame exactly.
- Check all four sides for a snug fit.
- Adjust the screen clips or fasteners if needed.
- Replace any damaged or missing parts before finishing.
Testing The Window Operation
Open and close the window slowly to test if the screen stays in place. The screen should not block the window movement.
Listen for any rubbing sounds or resistance. These can mean the screen is not aligned correctly.
- Slide the window up and down or side to side.
- Check if the screen stays secure during movement.
- Make small adjustments if the screen moves or gets stuck.
- Confirm the screen does not damage the window seal.
Credit: www.familyhandyman.com
Tips For Maintenance
Keeping your window screens in good shape helps them last longer. Proper care also keeps your windows looking clean and working well.
Follow simple steps for cleaning and protecting your screens. This saves time and prevents damage.
Regular Cleaning
Clean your window screens regularly to remove dust and dirt. This keeps air flowing freely and stops buildup that can cause wear.
- Remove the screen gently from the window frame.
- Use a soft brush or vacuum to clear loose dust.
- Wash with mild soap and water using a sponge.
- Rinse thoroughly with clean water.
- Let the screen dry completely before putting it back.
Preventing Damage
Protect your window screens from damage by handling them carefully and avoiding harsh conditions.
| Common Cause | Prevention Tip |
| Pets scratching screens | Trim pet nails and use pet deterrents near windows |
| Strong winds or storms | Remove screens during severe weather or secure them well |
| Rough handling | Lift screens by the frame, not the mesh |
| Sun damage | Use UV-protective spray on screens if exposed to intense sun |

Credit: www.angi.com
Frequently Asked Questions
How Do I Reattach A Window Screen From Inside?
To reattach a window screen from inside, align the screen with the window frame. Press the edges gently into the frame’s grooves. Use a spline roller to secure the screen if needed. This method avoids going outside and ensures a snug fit. If you ever need to remove the screen for cleaning or repairs, it's important to know how to take out window screens properly. Start by gently pulling the screen away from the frame, being careful not to damage the edges. Once removed, you can clean the screen thoroughly before reattaching it back in place.
What Tools Are Needed To Fix Window Screens Inside?
You need a spline roller, a new spline, and a flathead screwdriver. These tools help secure the screen into the frame properly. Having scissors or a utility knife is useful for trimming excess screen material. These basic tools make the process easy and efficient.
Can I Put A Window Screen Back Without Removing The Frame?
Yes, you can put the screen back without removing the frame. Position the screen inside the frame carefully. Press the screen edges into the frame’s groove. Use a spline roller to secure it tightly. This method saves time and effort.
How To Avoid Damaging Screens When Reinstalling?
Handle the screen gently to avoid tears or stretching. Use appropriate tools like a spline roller to press the screen evenly. Avoid forcing the screen into the frame. Taking your time prevents damage and ensures a proper fit.
Conclusion
Putting a window screen back on from inside is simple and quick. Follow the steps carefully and use gentle pressure. This keeps the screen secure and fits well. Taking your time helps avoid damage or frustration. Soon, fresh air will flow through your window again. If you're unsure about how to reattach a window screen, you can always refer to the manufacturer's instructions for guidance. Additionally, inspecting the frame and screen for any debris or damage before reinstalling can enhance the screen's longevity. With a bit of care, you'll ensure your window screen functions effectively for years to come.
Practice makes this task easier every time. You can handle this small fix without help. Enjoy your clean window screen and clear view once more.