Are you ready to beat the heat without spending hours on complicated setups? Installing a portable air conditioner window kit might sound tricky, but it doesn’t have to be.
With the right steps, you can have your cooler running smoothly in no time. In this guide, you’ll discover simple, clear instructions that make the whole process easy and stress-free. Stick with me, and you’ll be enjoying cool, refreshing air before you know it.
Let’s get started!
Choosing The Right Window Kit
Installing a portable air conditioner requires the correct window kit. The kit helps vent hot air outside through your window. Picking the right window kit ensures a secure fit and better cooling.
This guide covers how to measure your window, types of window kits, and compatibility with your portable AC unit. These points will help you choose the best kit.
Measuring Your Window
Measure your window to find the correct size for the window kit. Take the width and height of the open window frame. Measure in inches for accuracy.
- Measure the width of the window opening from one side to the other.
- Measure the height from the bottom to the top of the window frame.
- Check if the window opens vertically or horizontally.
- Write down the measurements before shopping for a kit.
Types Of Window Kits
Window kits come in different types to fit various window styles. Choose the type that matches your window for an easy and secure installation.
| Window Type | Kit Type | Features |
| Sliding Window | Adjustable Panel | Expands to fit width, easy to install |
| Double-Hung Window | Expandable Foam Seal | Seals gaps, fits vertically sliding windows |
| Casement Window | Custom Cut Panel | Requires trimming, fits crank windows |
| Awning Window | Specialized Seal | Fits outward-opening windows, weatherproof |
Compatibility With Portable Ac Units
Check that the window kit matches your portable air conditioner model. The exhaust hose size and vent design must fit the kit.
- Confirm the hose diameter matches the kit’s vent opening.
- Look for kits recommended by the AC unit manufacturer.
- Choose kits with adjustable lengths for flexible installation.
- Check if extra sealing materials come with the kit.

Credit: www.walmart.com
Gathering Necessary Tools
Installing a portable air conditioner window kit requires some preparation. Gathering the right tools can make the process smooth and easy.
Having the necessary items ready helps you finish the job quicker. Let's look at what you need.
Basic Tools Checklist
These basic tools are essential for installing your window kit. They help ensure a secure fit for your air conditioner.
- Measuring tape to measure window size
- Screwdriver for securing parts
- Scissors to cut sealing tape
- Level to ensure even installation
Optional Tools For Convenience
These tools are not necessary, but they can make the process easier. Consider using them if you have them available.
- Drill for faster screw installation
- Utility knife for precise cutting
- Pliers for gripping and twisting
- Extra sealing tape for a tight seal
Preparing The Window Area
Before installing a portable air conditioner window kit, prepare the window area carefully. This helps the unit fit well and work properly.
Cleaning, clearing, and checking the window are important steps for a good installation.
Cleaning The Window Frame
Remove dust and dirt from the window frame. A clean frame helps the air conditioner seal tightly.
Use a damp cloth or mild cleaner to wipe all sides of the frame. Let it dry before installation.
Removing Obstacles
Clear any items blocking the window. This includes curtains, blinds, or furniture that may get in the way.
Make sure nothing will stop the window from opening or closing smoothly with the kit installed.
- Pull back curtains or blinds
- Move furniture away from the window
- Remove screens if needed
Checking Window Stability
Check if the window frame is strong and stable. A weak frame can cause problems with the air conditioner.
Look for cracks, loose parts, or damage. Fix any issues before installing the kit.
- Press the frame gently to test strength
- Check for loose screws or nails
- Inspect the window glass for cracks
Assembling The Window Kit
Installing a portable air conditioner window kit helps vent hot air outside. It is important to assemble the kit correctly for best performance.
This guide shows how to put together the main parts of the window kit easily and quickly.
Unpacking Components
Start by unpacking all the pieces from the box. Check that you have each part before you begin assembly.
Common components include extension panels, seals, gaskets, screws, and the exhaust hose adapter.
- Extension panels
- Seals and gaskets
- Screws and fasteners
- Exhaust hose adapter
- Instruction manual
Attaching Extension Panels
Extension panels fit into your window frame to close gaps. They adjust to fit different window sizes.
Slide the panels together to reach the right length. Use screws or clips to lock them in place securely.
- Measure your window width first
- Extend panels to fit that width
- Connect panels firmly together
- Secure with provided screws or clips
Securing Seals And Gaskets
Seals and gaskets stop air leaks around the window kit. Proper sealing improves cooling efficiency.
Attach seals along the edges of the extension panels and window frame. Press them firmly to create a tight fit.
- Clean window frame before applying seals
- Place gaskets on panel edges
- Press seals evenly without gaps
- Check for any loose areas and adjust
Installing The Window Kit
Installing the window kit is an important part of setting up your portable air conditioner. This guide will help you fit the kit properly to keep hot air outside and cool air inside.
Follow these simple steps to place, secure, and adjust the window kit for the best performance of your air conditioner.
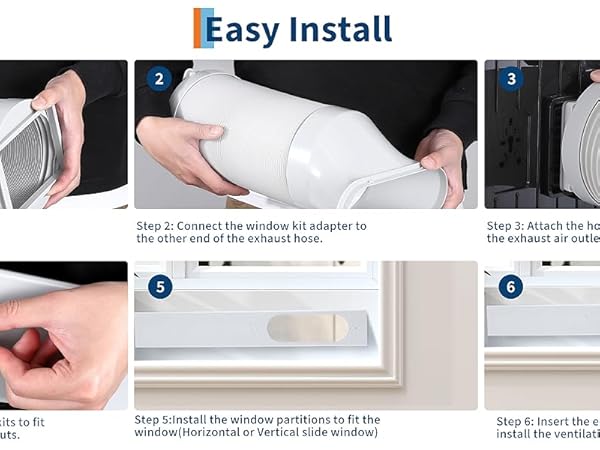
Positioning The Kit In The Window
First, open your window and place the window kit panel in the opening. Make sure the panel fits the size of your window. The exhaust hose will connect to the panel, so position it near the hose outlet.
- Measure your window opening before placing the kit.
- Insert the panel into the window frame firmly.
- Check that the hose connection hole aligns with the air conditioner’s exhaust.
Securing The Kit To The Frame
Once the kit is in place, secure it to the window frame to prevent it from moving or falling. Use the screws, brackets, or adhesive strips that come with the kit.
| Securing Method | Details |
|---|---|
| Screws | Attach the panel to the window frame using pre-drilled holes. |
| Brackets | Use brackets to hold the panel firmly on the sill or frame. |
| Adhesive Strips | Apply strips for a quick, non-invasive hold on the window surface. |
Adjusting For A Tight Fit
After securing the kit, check for gaps around the panel. A tight fit stops warm air from entering and cool air from escaping.
Use foam weatherstripping or seals to fill any spaces. Press firmly to ensure a good seal. Adjust the panel length if it has extendable parts to fit your window size exactly.

Credit: www.dreo.com
Connecting The Portable Ac Unit
Connecting your portable air conditioner correctly is important for efficient cooling. This guide covers how to attach the exhaust hose, seal the connection, and test the setup.
Follow these simple steps to ensure your portable AC works well and vents hot air outside.
Attaching The Exhaust Hose
First, connect the exhaust hose to the back of the portable AC unit. Most units have a round vent where the hose fits securely.
- Align the hose end with the vent outlet on the AC unit.
- Push the hose firmly onto the vent until it clicks or fits snugly.
- Make sure the hose is straight and not bent sharply to allow air flow.
Sealing The Hose Connection
Seal the connection between the exhaust hose and window kit to prevent hot air leaks. A tight seal keeps the room cooler and the AC efficient.
- Use weather stripping or foam tape around the hose edges.
- Check that the window kit fits tightly in the window frame.
- Secure any gaps with duct tape for extra sealing.
Testing The Setup
Test your portable AC setup before full use. This ensures the exhaust hose and seals work properly.
| Test | What to Check | Result |
| Power On | Unit turns on without error | Pass/Fail |
| Exhaust Air Flow | Air flows through hose outside | Strong/Weak |
| Seal Check | No hot air leaks around hose | Good/Needs Fix |
Tips For Maintenance And Safety
Installing a portable air conditioner window kit is simple. Keeping it well maintained ensures it works longer. Safety is important to avoid accidents and damage.
This guide shares easy tips to keep your air conditioner clean and safe. Follow these steps to enjoy cool air without problems.
Regular Cleaning
Clean the air filter every two weeks. A dirty filter blocks air and makes the unit work harder. Use warm water and mild soap to wash the filter.
Wipe the outside of the unit with a soft cloth. Avoid using strong chemicals that can damage the surface. Clean the window kit parts to remove dust and debris.
- Remove and wash filters regularly
- Wipe unit with a damp cloth
- Keep window kit free of dust
- Do not use harsh cleaners
Checking For Air Leaks
Check the window kit for gaps or cracks. Air leaks reduce cooling efficiency and waste energy. Seal any openings with weather stripping or foam tape.
Inspect the exhaust hose connections to make sure they fit tightly. Loose hoses can let hot air back into the room. Tighten or replace parts as needed.
- Look for gaps around the window kit
- Use weather stripping to seal leaks
- Check exhaust hose connections
- Fix or replace loose parts
Safe Operation Practices
Always place the air conditioner on a flat, stable surface. Avoid blocking the air intake or exhaust vents. Good airflow helps the unit work safely.
Do not use extension cords with the unit. Plug it directly into a wall outlet. Turn off the air conditioner before cleaning or moving it.
- Place unit on a flat surface
- Keep vents clear of obstructions
- Plug directly into a wall outlet
- Turn off unit before cleaning or moving

Credit: www.youtube.com
Frequently Asked Questions
How Do I Install A Portable Ac Window Kit?
First, measure your window and assemble the kit. Attach the exhaust hose to the AC unit. Secure the kit panels in the window frame. Seal gaps with weatherstripping. Connect the hose to the window panel. Ensure a tight fit for efficient cooling.
What Tools Are Needed For Installation?
You typically need a screwdriver, measuring tape, and possibly a drill. Some kits include mounting brackets and screws. Always check the kit instructions for specific tools required. Having a level can help align the window panel properly.
Can I Install The Kit Without Professional Help?
Yes, most portable AC window kits are designed for DIY installation. Follow the manufacturer’s instructions carefully. Ensure the window fits the kit dimensions. Basic tools and patience are essential. If unsure, consult a professional for assistance.
How Do I Ensure A Tight Seal In The Window Kit?
Use weatherstripping or foam tape around the edges. Check for any gaps between the window frame and kit panels. Press the panels firmly into place. This prevents hot air from entering and improves cooling efficiency.
Conclusion
Installing a portable air conditioner window kit can be simple and fast. Follow each step carefully to avoid mistakes. Make sure the kit fits your window properly for best results. Seal any gaps to keep cool air inside and hot air outside.
Regularly check the setup to maintain efficiency. Enjoy a cooler room without much hassle. This small effort brings comfort during hot days. Keep your space fresh and cool all summer long.