Have you ever taken your window screen off and struggled to put it back on? It can be tricky, frustrating, and sometimes even feel impossible.
But don’t worry—you’re not alone, and fixing it is easier than you think. In this guide, you’ll discover simple, step-by-step tips that make putting your window screen back on quick and hassle-free. Imagine saving time and avoiding damage to your screen or window.
Ready to get your screen in place like a pro? Let’s dive in.
Tools And Materials Needed
Putting a window screen back on is a simple task. You need the right tools and materials to do it well.
This guide covers the essential tools and how to pick the right screen material.
Essential Tools
You need some basic tools to fix a window screen. These tools help you remove, secure, and trim the screen.
- Flathead screwdriver – to pry the screen frame
- Screen rolling tool (spline roller) – to press the screen into the frame
- Utility knife or scissors – to cut excess screen material
- Replacement spline – rubber cord that holds the screen
- Measuring tape – to measure the screen size
- Gloves – to protect your hands from sharp edges
Choosing The Right Screen Material
Screen material comes in different types. Choose one based on where you live and your needs.
Common screen materials include fiberglass, aluminum, and pet-resistant mesh.
- Fiberglass:Easy to install and affordable. Good for most homes.
- Aluminum:Strong and durable but can dent easily.
- Pet-resistant:Made from tough fibers to resist tears from pets.

Credit: www.amazon.ca
Preparing The Window Frame
Before putting a window screen back on, you must prepare the window frame. This ensures the screen fits snugly and functions well.
Proper preparation includes cleaning and checking for any damage. This helps maintain a clear view and keeps bugs out.
Cleaning The Frame
A clean window frame helps the screen fit well. Dirt and debris can cause issues when attaching the screen.
Use a damp cloth to wipe away dust. A gentle cleaner can remove stubborn grime.
- Remove loose dirt with a soft brush
- Wipe with a damp cloth for deeper cleaning
- Ensure the frame is completely dry
Inspecting For Damage
Checking the frame for damage is important. Cracks or bends can affect the screen's fit.
Look for any signs of damage and repair them if needed. This can prevent further issues.
| Check for cracks |
| Look for bent areas |
| Repair or replace damaged parts |
Removing The Old Screen
Removing an old window screen is the first step to put a new one on. It helps to avoid damage and makes the new screen fit better.
This guide shows how to take off the old screen carefully. Follow these simple tips to get it done right.
Detaching The Screen Frame
Start by checking how the screen frame is attached to the window. Most screens sit in a groove or are held by clips.
Use your hands or a flat tool to gently lift or slide the frame out. Avoid bending or breaking the frame.
- Look for tabs, clips, or screws holding the frame
- Carefully release any fasteners
- Lift the frame straight out to avoid damage
Handling Screen Spline
The screen spline is the rubber strip that holds the mesh inside the frame. You need to remove it to take off the old screen.
Use a flat screwdriver or spline removal tool to pry out the spline carefully. Pull it out slowly to keep the frame intact.
- Insert a flat tool under the spline edge
- Lift the spline gently along the frame
- Remove the mesh once the spline is out

Credit: www.amazon.com
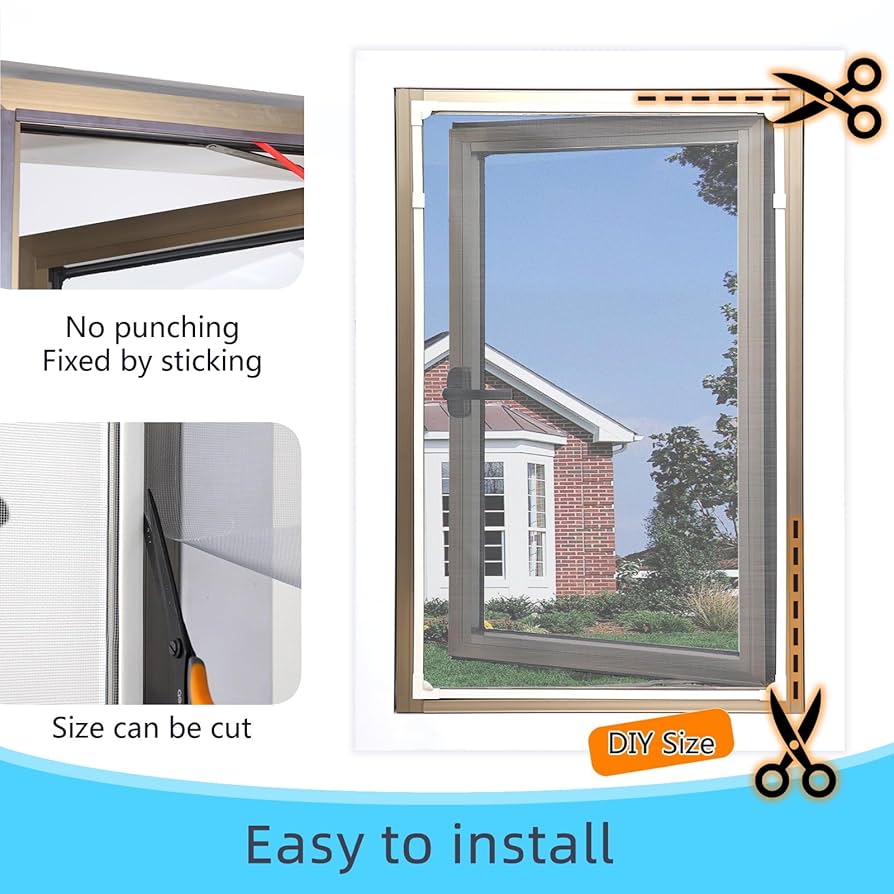
Installing The New Screen
Putting a new screen on your window frame helps keep bugs out. This guide shows you how to install it properly.
Follow these steps to cut the screen to size and secure it with spline for a tight fit.
Cutting The Screen To Size
First, measure the window frame to know how much screen you need. Add an extra inch on all sides to allow for adjustments.
Lay the screen material flat on a clean surface. Use scissors or a utility knife to cut the screen carefully along your measurements.
- Measure width and height of the frame
- Add one inch to each measurement
- Cut the screen material to the new size
Securing The Screen With Spline
Place the cut screen over the frame, making sure it overlaps the edges. Start pressing the spline into the groove to hold the screen.
Use a spline roller tool to push the spline firmly. Work around the frame evenly to avoid wrinkles or gaps in the screen.
- Position the screen over the frame
- Insert spline into the groove over the screen edge
- Roll spline with a spline roller for a tight fit
- Trim excess screen and spline after securing
Reattaching The Screen Frame
Putting a window screen back on is simple if you follow the right steps. Reattaching the screen frame keeps bugs out and fresh air in.
This guide focuses on aligning the frame and locking the screen in place for a secure fit.
Aligning The Frame
Hold the screen frame so it fits the window opening. Make sure the corners line up well.
Check that the screen mesh is tight and not folded or wrinkled. This helps the screen sit flat.
- Place the frame inside the window track
- Match the corners with the window edges
- Ensure the screen faces outward correctly
- Keep the mesh smooth and tight
Locking The Screen In Place
Once aligned, secure the screen frame to stop it from moving. Most windows use clips or spring-loaded latches.
Press the frame gently but firmly until you hear or feel it lock into place. Double-check all sides are secure.
- Use window clips to hold the frame tightly
- Push down on spring latches if available
- Check the screen does not wobble
- Test by opening and closing the window gently
Tips For Maintenance And Longevity
Keeping your window screens in good shape helps them last longer. Proper care also makes them look better and work well.
Here are some tips to maintain your window screens and keep them in top condition.
Regular Cleaning
Clean your window screens often to remove dust and dirt. This prevents buildup that can damage the screen material.
Use a soft brush or vacuum with a brush attachment. Gently clean both sides of the screen to avoid tearing.
- Remove the screen from the window frame carefully.
- Use mild soap mixed with water for washing.
- Rinse the screen with clean water after washing.
- Let the screen dry fully before putting it back.
Preventing Damage
Handle window screens with care to avoid bending or tearing. Rough use can shorten their life.
Check the screen frame and mesh regularly for any signs of wear. Fix small problems early to stop bigger damage.
- Avoid pushing or forcing the screen into the window frame.
- Keep pets and sharp objects away from screens.
- Store screens indoors during harsh weather or winter.
- Repair holes or tears as soon as you spot them.

Credit: www.amazon.com
Frequently Asked Questions
How Do I Reattach A Window Screen Properly?
To reattach a window screen, align it with the frame first. Insert the screen into the frame’s grooves. Secure it using spline or clips. Ensure it fits snugly without gaps to prevent bugs from entering.
What Tools Are Needed To Put A Window Screen Back?
You typically need a spline roller, screen spline, and flathead screwdriver. Sometimes, pliers or a utility knife help remove old spline. These tools make reinstalling a screen easier and ensure a tight fit.
How Do I Prevent Window Screens From Falling Out?
Make sure the screen fits tightly in the frame. Use spline or clips to hold it securely. Regularly check for damage or loose fittings and fix them promptly to avoid falls.
Can I Reuse An Old Window Screen Frame?
Yes, you can reuse an old frame if it’s undamaged. Clean the frame and check for bends or cracks. Replace the screen mesh and spline for a fresh, secure fit.
Conclusion
Putting a window screen back on is easier than it seems. Follow the steps carefully and take your time. Check the screen fits well and stays secure. A good screen keeps bugs out and lets fresh air in. Regular care helps your screen last longer.
Now you can enjoy fresh air without worry. Try it yourself—you'll feel proud and save money too. Simple tasks like this make a big difference at home.