Have scratches on your stainless steel sink ruined its smooth, shiny look? You’re not alone, and the good news is—these scratches don’t have to be permanent.
Imagine restoring your sink’s original gleam with simple, effective steps you can do yourself. You’ll discover easy, practical ways to remove those annoying marks and bring back that fresh, polished finish you love. Keep reading, and you’ll soon see your sink looking like new again.

Credit: www.amazon.com
Identify Scratch Types
Not all scratches on a stainless steel sink are the same. Knowing the type helps you fix them better.
Scratches can be light or deep. Each needs a different way to remove or reduce its look.
Light Surface Scratches
Light surface scratches are thin and shallow. They only affect the top layer of the sink.
These scratches often come from cleaning or rubbing with soft objects. You can usually polish them out.
- Look like fine lines
- Feel smooth when you run your finger over them
- Do not catch dirt easily
Deep Scratches
Deep scratches are wide and cut into the metal. They are more noticeable and harder to fix.
These scratches often happen from sharp or heavy objects. They may need special tools or professional help.
- Look like grooves or cuts
- Feel rough or raised edges
- Can trap dirt and water

Credit: www.reddit.com
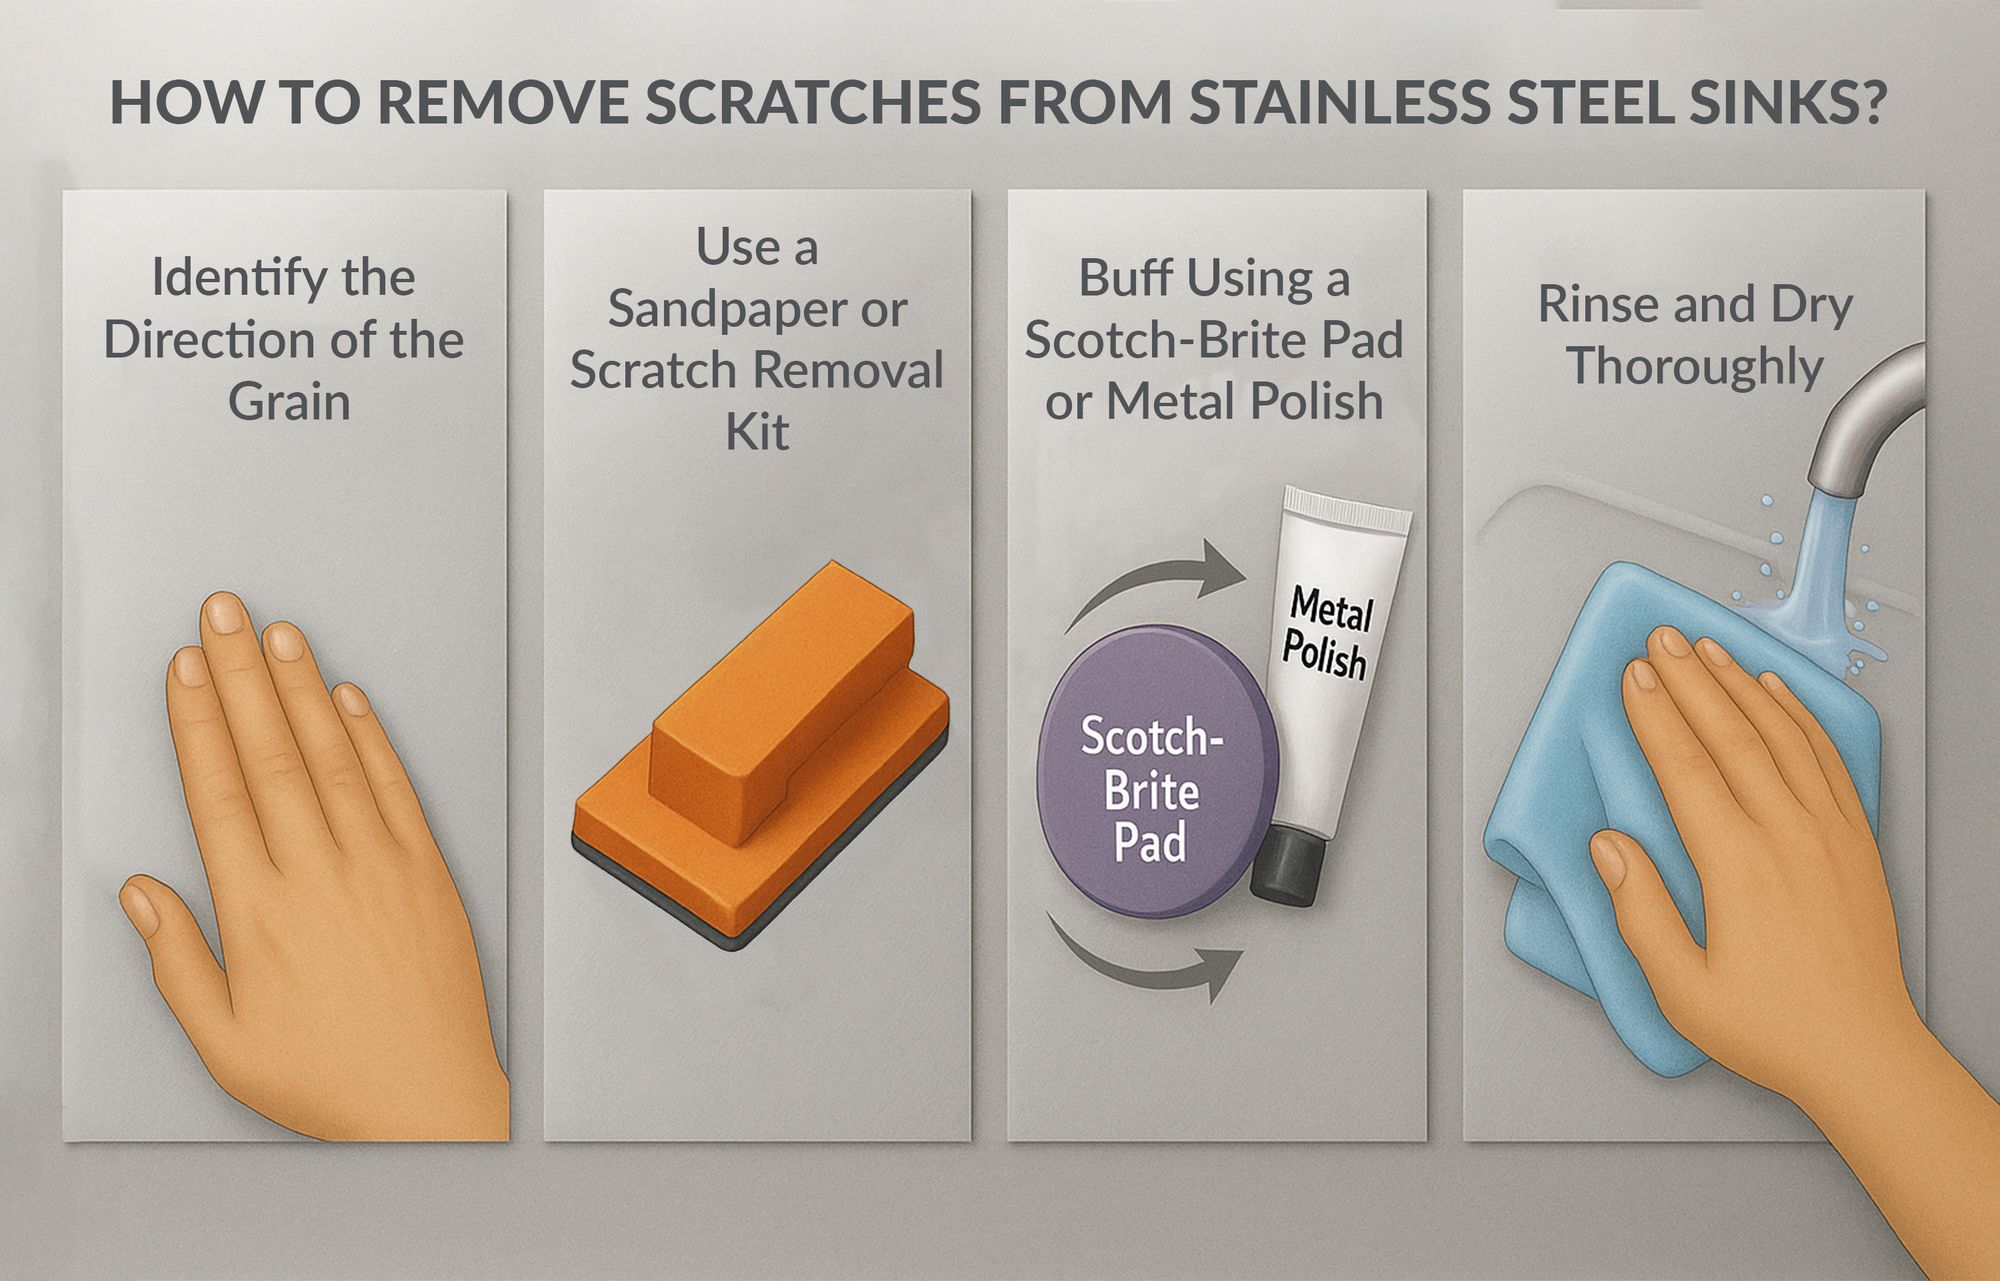
Prepare The Sink
Removing scratches from a stainless steel sink starts with good preparation. The sink must be clean and ready.
This step helps you see the scratches clearly and protects the sink during cleaning.
Clean The Surface
First, wash the sink with warm water and mild soap. This removes dirt and grime.
Use a soft cloth or sponge to avoid adding new scratches. Rinse well and dry with a clean towel.
Gather Needed Supplies
Collect all tools and materials before you start fixing the scratches. This saves time and effort.
- Soft cloths or microfiber towels
- Mild dish soap
- Non-abrasive sponge
- Stainless steel cleaner or polish
- Fine sandpaper or scrubbing pads (optional)
- Protective gloves
- Bucket of warm water
Use Gentle Cleaning Methods
Scratches on stainless steel sinks can make them look old. You can fix small scratches with gentle cleaning methods.
These methods are safe and do not harm the sink’s surface. They help keep your sink shiny and smooth.
Apply Baking Soda Paste
Baking soda is a mild abrasive that can remove light scratches. Make a paste by mixing baking soda with water.
Rub the paste on scratches using a soft cloth. Move in the direction of the sink’s grain to avoid more scratches.
- Mix 3 parts baking soda with 1 part water
- Apply paste gently on scratches
- Use a soft cloth and rub in sink’s grain direction
- Rinse with warm water and dry
Polish With Olive Oil
Olive oil can make your sink look shiny and hide small scratches. Use a small amount on a soft cloth.
Rub the oil over the sink surface in circular motions. This helps fill scratches and adds a smooth finish.
- Pour a few drops of olive oil on a soft cloth
- Rub the sink surface in small circles
- Focus on scratched areas
- Wipe off extra oil with a clean cloth
Try Abrasive Techniques
Removing scratches from a stainless steel sink can improve its look. Abrasive techniques help smooth out surface marks.
Use gentle scrubbing tools and polishing products to avoid causing more damage.
Use Non-abrasive Pads
Non-abrasive pads clean scratches without harsh effects. They protect the sink’s finish while reducing marks.
- Choose pads labeled safe for stainless steel.
- Wet the pad and sink surface before scrubbing.
- Rub gently in the direction of the grain.
- Rinse the sink often to check progress.
Employ Stainless Steel Polish
Stainless steel polish restores shine and hides fine scratches. Apply polish with a soft cloth for best results.
| Step | Action |
| 1 | Clean the sink with mild soap and water. |
| 2 | Dry the sink completely with a soft towel. |
| 3 | Apply a small amount of polish on a cloth. |
| 4 | Rub polish into scratches following the grain. |
| 5 | Buff the sink with a clean, dry cloth. |
Fix Deep Scratches
Deep scratches on a stainless steel sink can be unsightly. Fixing them requires careful sanding and polishing. This process helps restore the sink's smooth surface.
Use the right tools and follow safe steps to avoid further damage. Take your time and work gently for best results.
Sand With Fine Grit Sandpaper
Start by sanding the scratched area with fine grit sandpaper. Use 400 to 600 grit for deep scratches. Sand in the direction of the grain to avoid creating new marks.
- Clean the sink and dry it fully.
- Wrap the sandpaper around a sanding block for even pressure.
- Gently sand the scratch in one direction following the grain.
- Check progress often to avoid removing too much material.
- Wipe away dust with a damp cloth after sanding.
Buff And Polish
Buffing and polishing help blend the sanded area with the rest of the sink. Use a soft cloth and a stainless steel polish or a mild abrasive cleaner.
| Tool | Purpose | Tips |
| Soft cloth | Apply polish and buff surface | Use circular motions for even shine |
| Stainless steel polish | Restore luster and hide scratches | Apply small amounts, avoid harsh chemicals |
| Mild abrasive cleaner | Remove fine scratches and stains | Test on small area first |

Credit: www.amazon.com
Maintain Scratch-free Sink
A stainless steel sink can easily get scratched. Keeping it scratch-free requires a few simple habits.
Regular care will help your sink stay shiny and smooth for years.
Regular Cleaning Routine
Clean your sink regularly to prevent scratches. Use mild products to keep it looking new.
- Use a soft sponge or cloth for cleaning
- Rinse the sink after each use
- Dry the sink with a towel to avoid water spots
Avoid Harsh Chemicals
Harsh chemicals can damage the surface of your sink. Choose gentle alternatives for cleaning.
| Cleaner | Effect on Stainless Steel |
| Bleach | Can cause corrosion |
| Vinegar | Safe and effective |
| Baking Soda | Gentle and non-abrasive |
Frequently Asked Questions
How Can I Remove Light Scratches From A Stainless Steel Sink?
Use a non-abrasive cleaner or a baking soda paste with a soft cloth. Gently rub in the direction of the grain to restore shine.
What Household Items Remove Scratches On Stainless Steel Sinks?
Baking soda, white vinegar, and olive oil work well. They help to clean, polish, and minimize scratch visibility effectively.
Can Stainless Steel Sinks Be Restored To A Scratch-free State?
Minor scratches can be polished out, but deep scratches may need professional repair or replacement for best results.
Is It Safe To Use Abrasive Pads On Stainless Steel Sinks?
Avoid steel wool or harsh abrasives. Use non-abrasive pads or microfiber cloths to prevent further scratching.
Conclusion
Removing scratches from a stainless steel sink is simple and doable. Use gentle cleaning tools and mild abrasives to protect the surface. Regular care keeps your sink looking fresh and shiny. Small scratches fade with time and proper treatment. Clean and polish often for best results. Additionally, consider using natural solutions like baking soda and vinegar for effective cleaning. These cleaning hacks for stainless steel sinks not only help eliminate stains but also enhance the overall shine. With consistent care and the right techniques, your sink will maintain its elegant appearance for years to come. In addition to addressing scratches, it's essential to also remove stains from stainless steel to maintain its appearance. For tougher stains, a mixture of baking soda and water can work wonders, effectively lifting dirt without damaging the surface. By adopting a consistent cleaning routine, you can ensure your stainless steel sink remains both scratch-free and gleaming.
A little effort brings big improvement. Your sink will look neat and last longer. Try these tips and enjoy a scratch-free sink every day.