Wiring a three-way light switch might sound tricky, but you can do it yourself with the right guidance. Imagine controlling one light from two different spots—like turning on your hallway light from both ends.
That’s exactly what a three-way switch lets you do. If you’ve ever wondered how to set this up, you’re in the right place. You’ll learn simple steps to wire a three-way switch safely and effectively. By the end, you’ll have the confidence to handle this common home wiring project on your own.
Let’s get started!
Tools And Materials Needed
Wiring a three way light switch requires specific tools and materials. These help you do the job safely and correctly.
Gather everything before starting. This makes the work faster and easier.
Screwdrivers
You need screwdrivers to remove and secure switch covers and screws. A flathead and a Phillips screwdriver are best.
- Flathead screwdriver for slotted screws
- Phillips screwdriver for cross-shaped screws
Wire Strippers
Wire strippers remove the plastic insulation from electrical wires. This exposes the wire for connections.
Choose a tool with different gauge settings. This fits various wire sizes.
- Adjustable wire strippers work well
- Avoid cutting the metal wire inside
Voltage Tester
A voltage tester checks if wires have electricity. It helps you work safely by confirming power is off.
Use a non-contact voltage tester for easy and safe checks.
- Hold near wires to detect voltage
- No need to touch bare wires
Three Way Switches
You need two three way switches for this setup. Each switch controls the same light from different places.
Buy switches that match your home's voltage and style.
- Check for correct amperage rating
- Choose switches with clear terminal labels
Electrical Wire
Use proper electrical wire to connect switches and light. Usually, 14/3 or 12/3 cable is needed.
The wire has three insulated conductors plus a ground wire.
- Black, red, and white insulated wires
- Bare copper or green ground wire
Wire Nuts
Wire nuts connect wires safely and keep them insulated. They come in different sizes for various wire amounts.
Choose the right size to hold wires tightly without damage.
- Twist wires together before capping
- Match wire nut size to wire bundle
Electrical Tape
Electrical tape adds extra protection and holds wire nuts in place. It also insulates exposed wire ends.
Use high-quality, flame-resistant tape for safety.
- Wrap around wire nuts and wires
- Seal any exposed metal parts
Safety Gear
Wear safety gear to protect yourself during wiring. This includes gloves and safety glasses.
Insulated gloves help prevent electric shock. Glasses protect your eyes from debris.
- Insulated rubber gloves
- Safety glasses or goggles

Credit: www.reddit.com
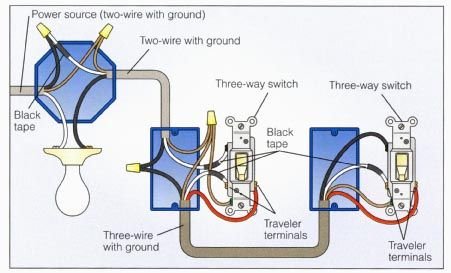
How A Three Way Switch Works
A three way switch lets you control one light from two different places. It is common in hallways or large rooms. Understanding how it works helps you wire it safely.
Unlike a regular switch, a three way switch has three terminals. These switches work together to turn the light on or off.
Basic Components
A three way switch setup uses two switches and one light. It also includes wires that connect the switches and the power source.
- Two three way switches
- One light fixture
- Power source (circuit breaker)
- Traveler wires
- Common wire (hot)
- Neutral wire
How The Switches Control The Light
Each three way switch has a common terminal and two traveler terminals. The switches change the path of electricity.
When you flip one switch, it changes which traveler wire connects to the common. This either completes or breaks the circuit to the light.
Electrical Paths Explained
| Switch Position | Traveler 1 | Traveler 2 | Light Status |
| Both switches up | Connected | Disconnected | Light ON |
| First switch up, second down | Disconnected | Connected | Light OFF |
| First switch down, second up | Connected | Disconnected | Light OFF |
| Both switches down | Disconnected | Connected | Light ON |
Safety Tips
- Turn off power at the breaker before wiring.
- Use a voltage tester to confirm no current.
- Label wires to avoid confusion.
- Follow local electrical codes.
- Consult a professional if unsure.
Safety Precautions
Wiring a three-way light switch can be tricky. It's important to take safety seriously. This guide will help you stay safe during the process.
Before starting, remember that working with electricity is risky. Always prioritize your safety to avoid accidents.
Turn Off Power
Make sure to turn off the power before you begin. This prevents electric shock and injuries.
- Go to your circuit breaker panel.
- Find the switch controlling the light circuit.
- Switch it to the "off" position.
- Use a voltage tester to confirm there is no power.
Use Proper Tools
Having the right tools helps ensure a safe installation. Use insulated tools to protect yourself.
| Tool | Purpose |
| Voltage Tester | Check if wires are live |
| Wire Strippers | Strip insulation off wires |
| Screwdriver | Secure switch in place |
| Insulated Pliers | Hold and twist wires safely |
Wear Safety Gear
Wearing safety gear protects you from hazards. Always wear rubber-soled shoes and safety goggles.

Credit: diy.stackexchange.com
Identifying Wires
Wiring a three way light switch requires knowing the different types of wires. Identifying wires helps you connect everything correctly. This guide explains the common wire colors and their roles.
Knowing the traveler wires and ground wire is also important. Each wire has a specific function in the circuit. Let’s look at these wires one by one.
Common Wire Colors
Electric wires come in standard colors to show their purpose. Here are the usual wire colors you will find in a three way switch setup.
| Wire Color | Purpose |
|---|---|
| Black | Hot wire carrying current |
| White | Neutral wire returning current |
| Red | Traveler wire for switching |
| Green or Bare Copper | Ground wire for safety |
Traveler Wires
Traveler wires connect the two switches in a three way circuit. They carry current back and forth to control the light from both switches.
- Traveler wires are usually red or black.
- There are two traveler wires between the switches.
- They allow the switches to work together.
Ground Wire
The ground wire helps protect against electric shock. It connects metal parts to the earth for safety.
- Ground wires are green or bare copper.
- Always connect the ground wire to the switch’s grounding screw.
- Do not connect ground wires to hot or neutral wires.
Turning Off Power
Before wiring a three way light switch, always turn off the power. This prevents electrical shocks and accidents.
Working with live wires is dangerous. Make sure the power is off at the main breaker box.
Locate The Circuit Breaker
Find your home's main electrical panel. It usually holds the circuit breakers or fuses.
Look for the breaker that controls the light switch you want to wire.
- The panel is often in the basement, garage, or utility room.
- Breakers are labeled for each room or area.
- Use a flashlight if the area is dark.
Switch Off The Correct Breaker
Flip the breaker handle to the OFF position. This cuts power to the switch.
Do not rely on the wall switch to turn off power. The breaker must be off.
- Turn off breakers one at a time if you are unsure which controls the switch.
- Label the breakers if they are not already marked.
Test The Power Is Off
Use a voltage tester or multimeter to check the wires. Make sure no electricity flows.
Test all wires in the switch box, not just one. Confirm the power is off before touching wires.
- Wear insulated gloves for extra safety.
- Touch the tester to each wire carefully.
- If the tester shows power, do not proceed.
- Double check the breaker is off if power is still present.
Use Safety Gear
Wear safety goggles and insulated gloves when working with electrical wiring.
Safety gear helps protect you from sparks and accidental shocks.
- Use tools with insulated handles.
- Keep your hands dry.
- Do not work in wet or damp conditions.
Removing Existing Switches
Before wiring a new three way light switch, you must remove the old switches safely. This process helps prevent electrical shock and makes your work easier.
Always turn off the power at the breaker box before starting. Use a voltage tester to confirm no electricity flows to the switches.
Turn Off The Power
Locate the circuit breaker that controls the switch. Flip it to the off position. Double check the switch with a voltage tester.
Remove The Switch Cover Plate
Use a screwdriver to remove the screws holding the cover plate. Take off the plate carefully to expose the switch and wires.
Unscrew The Switch From The Wall Box
Unscrew the screws that hold the switch to the electrical box. Gently pull the switch out so you can see the wiring behind it.
Disconnect The Wires
Identify each wire connected to the switch. Loosen the terminal screws and carefully remove the wires.
- Black or red wires usually carry power.
- White wires are neutral wires.
- Green or bare copper wires are ground wires.
Inspect And Label Wires
Label the wires with tape or markers. This step helps you connect them correctly later.
| Wire Color | Purpose |
|---|---|
| Black/Red | Live/Traveler wires |
| White | Neutral wire |
| Green/Bare Copper | Ground wire |
Wiring The First Switch
Wiring the first switch in a three way light setup is important for proper control. This switch connects power to the circuit and allows the light to be turned on or off from two locations.
Before starting, make sure the power is off at the breaker. Use a voltage tester to confirm no electricity flows to the wires you will handle.
Identify The Wires
The first switch box usually contains three wires: a hot wire, a traveler wire, and a neutral wire. Each has a specific role in the circuit.
- Hot wire:This brings power from the breaker to the switch.
- Traveler wires:These connect the first switch to the second switch.
- Neutral wire:This completes the electrical circuit back to the panel.
Connect The Hot Wire
Attach the hot wire to the common terminal on the switch. This terminal is usually marked or a different color from the others.
Use a screwdriver to tighten the screw securely. A loose connection can cause flickering or failure.
Attach The Traveler Wires
Connect the two traveler wires to the remaining brass terminals on the switch. These terminals allow the switch to communicate with the second switch.
| Terminal | Wire | Description |
| Common (Usually black screw) | Hot wire | Power from the breaker |
| Traveler 1 (Brass screw) | Traveler wire | Connects to second switch |
| Traveler 2 (Brass screw) | Traveler wire | Connects to second switch |
Ground And Neutral Wires
Connect the ground wire to the green screw on the switch or the metal box if grounded. The neutral wire usually bypasses the switch and goes directly to the light fixture.
Always cap off any unused wires with wire nuts. This prevents accidental contact and shorts.
Wiring The Second Switch
Wiring a three-way switch is a common task in home improvement. The second switch is crucial for controlling lights from two locations.
Understanding the wiring process will ensure safety and efficiency. Let's explore the steps involved in wiring the second switch.
Identify The Common Screw
Every switch has a common screw. This screw is usually black or darker than the others. It connects the switch to the power source or the light fixture.
- Locate the common screw on your second switch.
- Ensure it matches the screw on the first switch.
- Use a voltage tester to confirm the power is off before proceeding.
Connect The Traveler Wires
Traveler wires link the two switches, allowing control from both locations. They are usually red or black. Secure them properly to avoid loose connections.
Ensure the traveler wires are connected to the same colored screws on both switches for consistent operation.
Secure The Ground Wire
The ground wire is essential for safety. It is typically green or bare. Attach it to the green screw on the switch.
| Wire Color | Purpose |
| Black | Common Screw |
| Red | Traveler Wire |
| Green/Bare | Ground Wire |
Test The Switch
Once all connections are secure, restore power to the circuit. Test the switches to ensure they work from both locations.
If the light operates correctly, your wiring is successful. If not, double-check your connections.
Connecting The Light Fixture
Connecting the light fixture is a key part of wiring a three way light switch. Proper connections ensure the light works from both switches.
This guide explains how to safely and correctly connect the fixture wires in your electrical box.
Identify The Fixture Wires
Start by identifying the wires coming from your light fixture. Typically, there will be a black (hot), white (neutral), and a bare or green ground wire.
Connect The Neutral Wires
Join the white neutral wire from the fixture with the white neutral wire in the electrical box. Use a wire nut to secure them together.
Connect The Ground Wires
Connect the bare or green ground wire from the fixture to the ground wire in the box. This connection is important for safety.
Attach The Hot Wire To The Switch Loop
The black hot wire from the fixture connects to the black traveler wire coming from the three way switches. This completes the circuit for the light.
- Strip about 3/4 inch of insulation from each wire.
- Twist wires together clockwise before securing wire nuts.
- Double-check all connections are tight and secure.
- Carefully tuck wires back into the electrical box.
- Attach the fixture mounting bracket and secure the fixture.
Check Your Connections With This Wire Color Guide
| Wire Color | Function |
| Black | Hot (Power to Fixture) |
| White | Neutral (Return Path) |
| Bare/Green | Ground (Safety) |
Testing The Switches
After wiring a three way light switch, testing the switches ensures they work correctly. This step helps you find wiring mistakes or faulty switches.
Use simple tools and follow clear steps to check each switch. Testing saves time and keeps your wiring safe.
Tools Needed For Testing
Before testing, gather the right tools. These make the process easier and safer.
- Non-contact voltage tester
- Multimeter set to continuity
- Flashlight
- Insulated screwdriver
Testing With A Non-contact Voltage Tester
Use the non-contact voltage tester to check if power reaches the switches. Hold the tester near the wires or terminals.
The tester lights up or beeps when it detects voltage. This confirms the switch has power and is ready to control the light.
Checking Switch Operation With A Multimeter
Set your multimeter to continuity mode. This checks if the switch opens and closes the circuit properly.
- Turn off the power at the circuit breaker.
- Remove the switch cover plate.
- Touch the multimeter probes to the switch terminals.
- Flip the switch on and off.
- Watch for the multimeter beep or show zero resistance when the switch is on.
Using A Flashlight To Check The Light Fixture
Turn the power back on and use a flashlight if the room is dark. Flip each switch and see if the light turns on or off.
| Switch Position | Light Status |
|---|---|
| Switch 1 ON, Switch 2 OFF | Light ON or OFF (depends on wiring) |
| Switch 1 OFF, Switch 2 ON | Light ON or OFF (opposite of above) |
| Switch 1 ON, Switch 2 ON | Light OFF or ON (opposite state) |
| Switch 1 OFF, Switch 2 OFF | Light OFF or ON (opposite state) |
If the light does not respond correctly, recheck your wiring or switch connections.
Troubleshooting Common Issues
Wiring a three way light switch can sometimes cause problems. It is important to check common issues to fix the problem quickly.
This guide helps you find and fix common problems like switches not working, light flickering, and loose connections.
Switches Not Working
If both switches do not turn the light on or off, the wiring may be incorrect. Check that the wires connect to the right terminals on each switch.
Make sure the power is turned off before testing connections. Use a voltage tester to confirm power flow to the switches.
- Check traveler wires between switches
- Verify common terminal connections
- Ensure no wires are loose or broken
- Test switches individually for faults
Light Flickering
Flickering lights usually mean a poor connection. This can happen if wires are not tight or if the bulb is loose in the socket.
Try tightening the bulb or replacing it. If the flicker continues, check the wiring at both switches and the light fixture.
- Tighten the light bulb
- Inspect wire connections at switches
- Look for damaged wires or terminals
- Replace old or faulty bulbs
Loose Connections
Loose connections cause many problems with three way switches. They can create sparks or stop the switch from working.
Turn off power and check all wire nuts and terminal screws. Make sure wires are secure and no copper is exposed outside connectors.
- Turn off power before inspecting
- Tighten all terminal screws firmly
- Secure wire nuts properly
- Trim and re-strip wires if needed
Credit: www.doityourself.com
Frequently Asked Questions
What Tools Do I Need To Wire A Three Way Switch?
You need a screwdriver, wire stripper, voltage tester, needle-nose pliers, and electrical tape. These tools ensure safe, efficient wiring.
How Do Three Way Switches Control One Light?
Three way switches use traveler wires to control one light from two locations. They allow on/off control independently.
Can I Replace A Single Switch With A Three Way Switch?
Yes, but you must add a second switch and run traveler wires between them. Proper wiring is essential.
What Color Wires Connect In A Three Way Switch Setup?
Typically, black (hot), white (neutral), red and black traveler wires connect. Correct wiring prevents electrical hazards.
Conclusion
Wiring a three-way light switch can feel tricky at first. Take your time and follow each step carefully. Double-check your connections before turning the power back on. Safety always comes first. With patience, you can control lights from two places easily.
This simple skill saves time and adds convenience at home. Keep practicing, and soon it will feel natural. Don’t hesitate to ask an expert if unsure. Enjoy the new lighting control you created yourself!