Are you looking to control two lights with just one switch? Wiring two lights to a single switch might seem tricky, but it’s easier than you think.
With the right steps, you can brighten up your room exactly how you want. Imagine flipping one switch and having both lights turn on instantly—no hassle, no confusion. In this guide, you’ll discover simple, clear instructions that anyone can follow.
By the end, you’ll feel confident tackling this project yourself, saving time and money. Ready to get started? Let’s dive in and light up your space the smart way!
Tools And Materials Needed
Wiring two lights to a switch needs careful planning. Using the right tools and materials makes the job safe and easier.
Before starting, gather all tools and materials. This saves time and helps avoid mistakes.
Screwdrivers
Screwdrivers help you open switch boxes and fix wires. You need both flathead and Phillips types.
- Flathead screwdriver for flat screws
- Phillips screwdriver for cross-shaped screws
Wire Strippers
Wire strippers remove insulation without damaging wires. This tool is essential for making clean connections.
Voltage Tester
A voltage tester checks if wires have power. It keeps you safe by making sure electricity is off before work.
Electrical Tape
Electrical tape insulates wire connections. It prevents shorts and protects wires from damage.
Wire Nuts
Wire nuts connect multiple wires securely. They keep wires together and stop them from coming loose.
Electrical Wire
You need electrical wire to connect the switch and lights. Use wire rated for home electrical work.
- 14-gauge wire for 15-amp circuits
- 12-gauge wire for 20-amp circuits
Light Switch
The switch controls the power to your lights. Choose a switch that fits your wall box and circuit type.
Lights And Fixtures
Select two light fixtures that match your room style. Check their voltage and wattage ratings.
Safety Gear
Wear safety gear to protect yourself. Use gloves and safety glasses to avoid cuts and sparks.

Credit: serviceteam.co.uk
Safety Precautions
Wiring two lights to a switch can be risky if safety is ignored. It is important to follow safety rules to avoid electric shocks or fires.
Before starting, prepare the right tools and understand basic electrical safety. This guide covers key safety steps for wiring two lights.
Turn Off Power
Always switch off the main power at the circuit breaker before working on any wiring. Test with a voltage tester to confirm no electricity flows.
Use Proper Tools And Equipment
Use insulated tools designed for electrical work. Wear rubber-soled shoes and avoid working in wet areas to reduce shock risk.
Follow Wiring Codes
Adhere to local electrical codes and standards. Correct wire sizes and connectors must be used for safe and reliable installation.
Check Connections Carefully
- Make sure wires are connected tightly to avoid loose contacts.
- Use wire nuts or terminal blocks to secure wire ends.
- Double-check all connections before restoring power.
Use A Ground Wire
Connect the ground wire properly to prevent electric shock. The ground wire should link to the switch and both light fixtures.
Test The Setup Safely
| Test Step | Action | Expected Result |
|---|---|---|
| 1 | Turn power back on at breaker | No sparks or unusual sounds |
| 2 | Flip the switch | Both lights turn on and off smoothly |
| 3 | Check for heat or smell | No heat or burning smell near wiring |
Basic Electrical Concepts
Understanding basic electrical concepts is key to wiring lights. Electricity flows through circuits to power devices like lights and switches.
By learning these concepts, you can safely wire two lights to a switch. This guide covers circuits, switches, and wire color codes.
Understanding Circuits
Circuits are paths that electricity travels through. They connect power sources to devices like lights. A complete circuit is necessary for electricity to flow.
- Power source provides electricity.
- Wires carry the electricity.
- Devices use the electricity.
- Switches control the flow.
Types Of Switches
Switches control the flow of electricity in a circuit. They can turn lights on or off. Understanding switch types helps in selecting the right one for wiring.
| Switch Type | Description |
| Single-Pole | Controls one circuit. |
| Three-Way | Controls a circuit from two locations. |
| Dimmer | Adjusts light brightness. |
Wire Color Codes
Wire color codes help identify the purpose of each wire. Knowing these codes is vital for safe and correct wiring.
- Black:Hot wire, carries current.
- White:Neutral wire, completes circuit.
- Green or Bare:Ground wire, prevents shock.
Planning Your Wiring Setup
Wiring two lights to one switch needs clear planning. You must understand the parts and how they connect.
This guide helps you prepare your wiring setup safely and correctly before starting the job.
Choosing The Right Switch
Select a switch that can handle the total load of both lights. A standard single-pole switch usually works.
- Check the switch's amperage rating to match your circuit.
- Decide if you want a toggle, rocker, or dimmer switch.
- Make sure the switch fits your wall box size.
- Consider switches with clear ON/OFF markings for safety.
Determining Wire Routes
Plan the path your wires will take from the power source to the switch and lights. Keep wires neat and safe.
| Wire Segment | Purpose | Tips |
|---|---|---|
| Power Source to Switch | Brings electricity to the switch | Use proper gauge wire and secure it with staples |
| Switch to First Light | Controls the first light | Keep wire length short to reduce voltage drop |
| First Light to Second Light | Connects both lights in sequence | Use wire connectors to join wires safely |
Step-by-step Wiring Process
Wiring two lights to one switch is a common electrical task. This guide explains each step clearly. Follow the instructions carefully to ensure safety and success.
Before starting, gather all tools and materials. Wear safety gear and work patiently to avoid mistakes.
Turning Off Power
Safety is the first priority. Turn off the power to the circuit you will work on. Use the main breaker panel to switch off the correct breaker.
- Locate your home's breaker box.
- Find the breaker for the room or area where you will work.
- Switch off the breaker to cut power.
- Use a voltage tester to confirm no power at the switch and lights.
Connecting The Switch
Identify the switch box and remove the cover plate. Connect the wires to the switch properly. Usually, you will connect the power source and the wires leading to the lights.
- Connect the black (hot) wire from the power source to one terminal on the switch.
- Attach the black wire going to the first light to the other terminal.
- Connect the white (neutral) wires together with a wire nut, not to the switch.
- Attach the ground wires to the green screw or grounding point.
Wiring The First Light
In the first light box, connect the wires coming from the switch and the wires leading to the second light. Match the colors to keep the circuit safe.
| Wire Color | Connection |
|---|---|
| Black | Connect to the light fixture's black wire. |
| White | Connect to the light fixture's white wire. |
| Ground (bare or green) | Connect to the fixture's ground wire or screw. |
Also, connect the black wire going to the second light with the black wire from the switch using a wire nut.
Wiring The Second Light
At the second light box, connect the wires from the first light to the second fixture. Keep the connections correct for the circuit to work.
- Connect the black wire to the second light's black wire.
- Connect the white wire to the second light's white wire.
- Connect the ground wire to the fixture’s ground.
Securing Connections
After all wires are connected, tighten wire nuts and screws. Make sure no wires are exposed. Use electrical tape if needed for extra safety.
- Check each wire nut for tightness.
- Wrap wire nuts with electrical tape.
- Push wires neatly into boxes.
- Secure switch and light fixture covers.
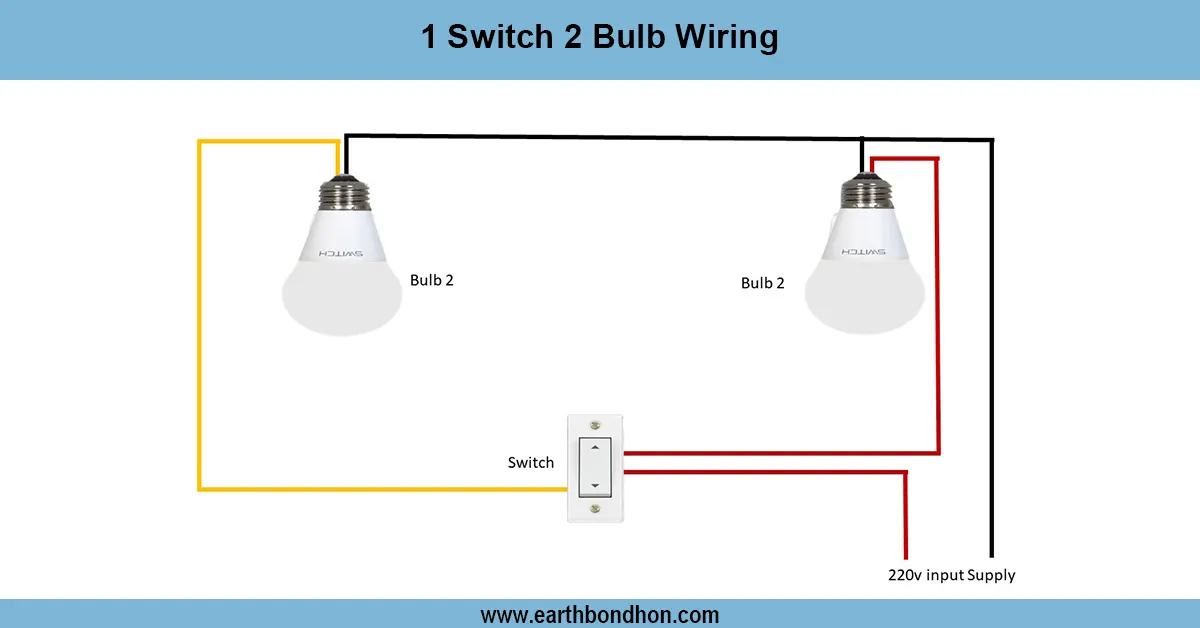
Credit: earthbondhon.com
Testing Your Wiring
After wiring two lights to a switch, testing is important. It ensures safety and proper function.
Testing helps find mistakes before turning on the power fully. Use tools to check your work.
Turn Off The Power
Always turn off power at the circuit breaker. This stops electric shock during testing.
Use a non-contact voltage tester to confirm the wires are not live before touching them.
Check Wire Connections
Look at all wire connections. Make sure wires are tight and secure under screws or connectors.
- No loose wires or exposed copper
- Correct wires connected to switch terminals
- Ground wires properly attached
Use A Continuity Tester
A continuity tester shows if wires connect properly. It checks if current can flow through the circuit.
Test from the switch to each light socket. The tester should beep or light up if connection is good.
- Test between switch terminals and light wires
- Check each light separately
- Fix any broken connections found
Turn Power On And Test Switch
After confirming wiring is safe, turn power back on at the breaker. Then, test the switch.
Flip the switch to see if both lights turn on and off. Test each light bulb to ensure they work.
- Switch on: both lights should glow
- Switch off: both lights should go dark
- Replace bulbs if needed
Use A Voltage Tester On Lights
A voltage tester checks if power reaches the light sockets. It confirms the switch sends current.
Place the tester probe on the socket terminal with the switch on. It should show voltage presence.
Troubleshooting Common Issues
Wiring two lights to a switch can sometimes cause problems. Knowing how to fix common issues helps keep your lights working.
This guide covers simple fixes for frequent problems you might face.
Lights Won't Turn On
If your lights do not turn on, check the power source first. Make sure the circuit breaker is on and the fuse is not blown.
Also, inspect the switch wiring. Loose or wrong wires can stop the lights from working.
- Check the circuit breaker and fuses.
- Tighten all wire connections at the switch.
- Test the switch with a voltage tester.
One Light Works, The Other Does Not
If only one light works, check the wiring between the two lights. A loose wire or bad connection may cause this.
Also, test the bulb in the non-working light. Sometimes, the bulb is the problem.
- Inspect wire connections between lights.
- Swap bulbs to test if they are faulty.
- Look for damaged or broken wires.
Switch Feels Warm Or Hot
A warm or hot switch can mean a bad connection or overloaded circuit. This is unsafe and needs fixing right away.
Turn off power before checking the switch. Tighten loose wires or replace the switch if needed.
- Turn off the power at the breaker.
- Check for loose or damaged wires.
- Replace the switch if it is old or faulty.
Lights Flicker Or Dim
Flickering or dim lights can be caused by loose wires or a weak power supply. This can also happen if the bulbs are not compatible.
Check all connections and try using bulbs that match the fixture’s requirements.
- Secure all wire connections.
- Use the correct type and wattage of bulbs.
- Check for issues in the main power supply.
Switch Does Not Control Both Lights
If the switch controls only one light, the wiring may be incorrect. Both lights must connect to the switch’s load wire.
Review your wiring plan and ensure both lights are wired in parallel to the switch.
- Check that both lights connect to the switch wire.
- Wire lights in parallel, not in series.
- Use a wiring diagram to verify connections.
Credit: www.reddit.com
Tips For Maintenance And Upgrades
Keeping your two-light wiring system in good shape helps avoid problems. Regular checks make sure everything works well and stays safe.
Upgrading your setup can improve lighting and energy use. Simple changes can make a big difference in your home's comfort.
Regular Inspection
Check your switch and lights often for signs of damage. Look for loose wires, scorch marks, or flickering lights. These signs show you need repairs.
Cleaning And Dusting
Dust can build up inside light fixtures and switches. Clean them gently with a dry cloth. Keep moisture away to avoid electrical issues.
Upgrading To Energy-efficient Bulbs
Switch to LED or CFL bulbs for better energy savings. These bulbs last longer and use less power. This upgrade lowers your electric bill.
- Choose bulbs with the right brightness and color temperature
- Match bulb base size to the fixture
- Turn off power before changing bulbs
- Recycle old bulbs properly
Replacing Old Wiring
Old wires can wear out and cause shorts. Replace damaged wires with new ones of the same type and size. Use proper connectors and secure wires tightly.
| Wire Type | Common Use | Safety Tip |
| 14-gauge | Lighting circuits | Check insulation for cracks |
| 12-gauge | Outlet circuits | Use for higher loads |
| Ground wire | Safety grounding | Must be connected properly |
Frequently Asked Questions
How Do I Connect Two Lights To One Switch?
To connect two lights to one switch, run a wire from the switch to the first light. Then, connect the first light to the second light using a parallel wiring method. This allows both lights to operate together from a single switch.
What Tools Are Needed To Wire Two Lights To A Switch?
You’ll need a screwdriver, wire strippers, electrical tape, a voltage tester, wire nuts, and appropriate wiring. Also, ensure you have a switch rated for the total load of both lights for safety and proper function.
Can I Use One Switch For Different Light Types?
Yes, one switch can control different light types if the total wattage is within the switch’s rating. Always check the switch specifications and use compatible bulbs to avoid electrical issues.
Is It Safe To Wire Two Lights On One Circuit?
Yes, wiring two lights on one circuit is safe if the total load doesn’t exceed circuit limits. Use proper gauge wire and ensure connections are secure and comply with electrical codes.
Conclusion
Wiring two lights to one switch is a useful skill. It saves space and makes your room look neat. Always turn off the power before starting any wiring work. Follow safety rules to avoid accidents. Double-check all connections to ensure lights work properly.
With clear steps, this task becomes simple and safe. Now, you can control two lights with just one switch. Enjoy your improved lighting setup and feel confident in your wiring skills.