Are you ready to give your door a strong, stylish upgrade? Knowing how to make a header for a door is a skill that can save you money and add value to your home.
Whether you’re fixing a doorway or creating a new entrance, a well-built header is the key to support and durability. In this guide, you’ll discover simple steps and expert tips that anyone can follow. By the end, you’ll feel confident to tackle this project yourself and see real results.
Keep reading, and let’s build something great together!
Tools And Materials Needed
Building a strong header for a door requires the right tools and materials. Preparing these items before you start will help the process go smoothly. This guide covers the essential tools, lumber choices, and extra supplies you might need.
Using proper materials ensures the header will support the door correctly. Safety is also important, so having the right equipment keeps your work safe and accurate.
Essential Tools
- Measuring tape to get precise dimensions
- Circular saw or handsaw to cut lumber
- Hammer for nails and framing
- Level to keep the header straight
- Square for accurate corners
- Drill with screwdriver bits
- Safety goggles and gloves
Choosing The Right Lumber
Picking good lumber is key to a strong door header. Use wood that is sturdy and fits the size of your door frame. Common choices include pine or fir because they are strong and easy to work with.
| Lumber Type | Strength | Cost | Best Use |
|---|---|---|---|
| Pine | Medium | Low | Standard door headers |
| Fir | High | Medium | Heavy doors or wide openings |
| Oak | Very High | High | Extra strong support needed |
Additional Supplies
Besides tools and lumber, other supplies help finish the header properly. Nails and screws hold pieces together. Construction adhesive adds extra strength. You may also need shims to adjust the fit.
- Galvanized nails or screws
- Construction adhesive
- Wood shims
- Wood filler for gaps
- Sandpaper to smooth edges
Credit: medium.com
Measuring The Door Opening
Creating a header for a door requires precise measurements. This ensures a proper fit and structural integrity. Let's break down the steps for measuring the door opening.
Accurate measurements are crucial to avoid issues during installation. Here, we will guide you on how to measure width, height, and account for any load-bearing requirements.
Width And Height Measurements
Begin by measuring the width of the door opening. Use a tape measure to check the distance from one side of the frame to the other. Measure at the top, middle, and bottom to ensure consistency.
- Measure the width at three points: top, middle, and bottom.
- Record the smallest measurement for accuracy.
- Measure the height from the floor to the top of the opening.
- Ensure your measurements are straight and accurate.
Accounting For Load-bearing Requirements
In some cases, headers must support additional weight. This requires extra care in planning and construction. It is vital to identify if your door frame is load-bearing.
| Measurement Type | Importance |
| Width | Ensures door fits the frame |
| Height | Allows for proper door installation |
| Load-Bearing | Supports additional structural weight |
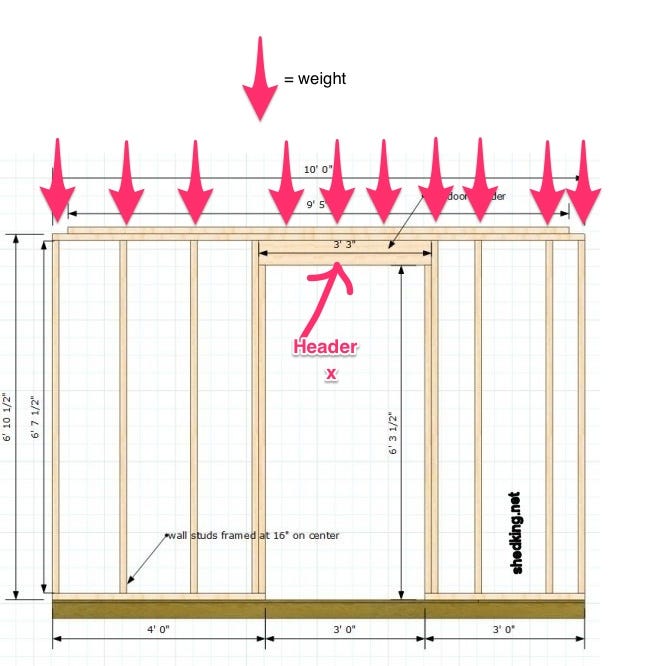
Designing The Header
A header is a beam placed above a door opening. It supports the weight from above the door. Designing the right header ensures the door stays stable and safe.
This guide explains how to design a door header. You will learn about size, types, and load capacity.
Selecting Header Size
Choose a header size that fits the door width and wall thickness. The header must be long enough to rest on both sides of the door frame.
Use thicker or wider headers for wider doors or heavier walls. A too-small header can cause cracks or collapse.
Types Of Headers
Headers come in many types based on material and design. Common types include wood, steel, and engineered lumber.
- Wood headers:Easy to cut and install. Good for small doors.
- Steel headers:Strong and thin. Used for wide doors or heavy loads.
- Engineered lumber:Made from glued wood layers. Very strong and stable.
Calculating Load Capacity
Load capacity means how much weight the header can hold. This depends on the material, size, and span of the header.
Calculate the load by adding the weight of the roof, floors, and walls above the door. Then choose a header that can hold that weight safely.
| Factor | Description |
|---|---|
| Span | Distance between supports under the header |
| Material | Type of wood, steel, or engineered lumber |
| Load | Total weight from roof, floors, and walls |
| Safety Factor | Extra strength for safety and durability |
Cutting The Lumber
Cutting the lumber is a key step to make a strong header for your door. You need to be precise with your cuts. This helps the header fit well and hold the weight above the door.
Use the right tools and follow safety rules to avoid mistakes and injuries. Careful cutting makes your project easier and safer.
Marking The Cuts
Start by measuring the lumber carefully. Mark where you will cut with a pencil. Check your marks twice to avoid errors. Use a square tool to make straight lines across the wood.
- Measure the length needed for the header
- Mark the cut line clearly with a pencil
- Use a carpenter's square for straight marks
- Double-check all measurements before cutting
Safe Cutting Techniques
Always wear safety glasses and hearing protection when cutting lumber. Keep your hands away from the saw blade. Use clamps to hold the wood steady. Cut slowly and smoothly to keep control.
- Wear safety glasses and ear protection
- Keep your fingers at least 6 inches from the blade
- Use clamps to secure the wood
- Cut with a steady, even speed
- Check your saw blade is sharp and clean
Assembling The Header
Making a strong header is important for door support. It holds the weight above the door opening.
This guide explains how to assemble the header properly for safety and durability.
Layering And Nailing
Start by cutting the wood pieces for the header. Usually, two or three layers are needed.
Place the layers together and nail them tightly to make one solid beam.
- Use 2x6 or 2x8 lumber for each layer
- Align edges before nailing
- Use 3-inch nails spaced every 6 to 8 inches
- Nail from both sides for strength
Reinforcement Options
You can add metal plates or plywood to make the header stronger. These reinforcements prevent bending.
Steel plates or plywood strips are nailed over the wood layers to add extra support.
- Use metal connector plates at joints
- Attach plywood strips on top and bottom
- Apply construction adhesive between layers
- Check for level and straightness after reinforcement
Installing The Header
Installing a header above a door is important for support and safety. This guide shows how to install it properly.
Follow the steps carefully to ensure the door frame is strong and secure.
Preparing The Door Frame
Clear the area around the door frame. Remove any old materials or debris. Check that the studs are straight and solid.
- Remove drywall or plaster near the top of the frame.
- Inspect the studs for damage or warping.
- Measure the width of the door opening carefully.
- Cut back any nails or screws sticking out.
- Make sure the floor is level under the door.
Positioning The Header
Place the header piece on top of the door frame. It should fit tightly between the studs. Make sure it is level from side to side.
| Header Position | Check Point |
| Left Side | Flush with stud edge |
| Right Side | Flush with stud edge |
| Top | Level and even |
| Depth | Aligned with wall surface |
Securing In Place
Fix the header securely to the frame. Use nails or screws that are strong enough to hold the weight.
- Hold the header tightly against the studs.
- Drive nails or screws through the header into each stud.
- Use at least three fasteners on each side for strong support.
- Check again to make sure the header stays level.
- Add extra support if the header is very long.
Finishing Touches
Once the main structure of your door header is built, you need to add finishing touches. These steps make the header strong and look good. They also protect it from weather damage.
Focus on adding support posts first. Then, seal and paint the header to keep it safe and neat.
Adding Support Posts
Support posts hold the weight of the header and door frame. They stop the header from sagging or falling. Place them correctly for best strength.
- Measure the height needed for the posts carefully.
- Cut the posts from strong wood like oak or pine.
- Attach posts on both sides of the door frame using nails or screws.
- Make sure the posts are vertical and flush with the header.
- Check stability by gently pushing the posts after installation.
Sealing And Painting
Sealing and painting protect the wood from moisture and sun damage. They also improve the header’s look and lifespan.
| Material | Recommended Sealant | Paint Type |
| Wood | Waterproof wood sealant | Exterior latex paint |
| Metal | Rust-inhibitor primer | Oil-based enamel paint |
| Composite | All-purpose sealant | Acrylic exterior paint |
Follow these tips for sealing and painting:
- Clean the surface before applying sealant.
- Apply sealant evenly with a brush or spray.
- Let the sealant dry fully before painting.
- Use at least two coats of paint for best coverage.
- Allow each paint coat to dry before applying the next.

Credit: www.jlconline.com
Common Mistakes To Avoid
Making a header for a door needs careful planning. Small errors can cause big problems later. Avoid these common mistakes to build a strong and safe header.
Learn what to watch for in measurements, support, and materials. Fixing these issues early saves time and effort.
Incorrect Measurements
Wrong measurements can make the header too short or too long. This weakens the structure and may cause damage.
- Measure the door opening width accurately.
- Account for extra length to support the load.
- Check measurements twice before cutting materials.
- Include space for the header to fit snugly.
- Use a level to ensure horizontal alignment.
Improper Support
Headers need proper support from the sides and below. Without it, the door frame can sag or fail.
| Support Type | Why It Is Important | Common Error |
| Jack Studs | Hold the header ends firmly | Using weak or missing studs |
| Cripples | Transfer weight to the floor | Spacing too wide or missing |
| Sill Plate | Provides base for the door frame | Not level or secure |
Using Wrong Materials
Choosing the wrong materials can cause the header to fail under pressure. Use the right wood or steel for strength.
- Softwoods that bend easily
- Old or damaged lumber
- Thin metal that cannot hold weight
- Untreated wood exposed to moisture

Credit: www.reddit.com
Frequently Asked Questions
What Materials Are Needed To Make A Door Header?
To make a door header, you need lumber (usually 2x6 or 2x8), nails or screws, a saw, and a hammer. Proper measuring tools and safety gear are also essential for accuracy and protection during construction.
How Do You Measure For A Door Header?
Measure the width of the door opening plus the thickness of the king studs. Add extra length for proper support and to fit securely between studs.
What Is The Purpose Of A Door Header?
A door header supports the weight above the door opening. It transfers load from the structure above to the studs on either side of the door.
Can I Use Metal Instead Of Wood For Door Headers?
Yes, metal headers like steel are strong and durable. They are often used in commercial buildings or when extra strength is needed in residential projects.
Conclusion
Making a header for a door is easier than it seems. Choose the right materials and measure carefully first. Cut the wood to size and assemble it step by step. Secure the header properly to keep the door safe and strong.
Take your time and follow the steps with care. This simple project can improve your home’s structure and look. Practice makes perfect, so don’t rush. Soon, you will build headers like a pro, adding value to your space.