Is your lawn mower pull string broken or stuck? Don’t worry—fixing it yourself is easier than you think.
Knowing how to change a pull string can save you time and money, so you’re not stuck waiting for repairs or buying a new mower. In this guide, you’ll get simple, step-by-step instructions that anyone can follow. By the end, you’ll have your mower ready to go and your yard looking great again.
Let’s get started!
Tools Needed
Changing a pull string on a lawn mower needs the right tools. Having these tools ready makes the job easier and faster.
This guide covers all the tools you will need for a smooth repair process.
Screwdrivers
Screwdrivers help you open the mower’s cover or engine casing. Most lawn mowers use Phillips or flathead screws.
Use the right size screwdriver to avoid damaging the screws or mower parts.
- Phillips screwdriver for cross-head screws
- Flathead screwdriver for slotted screws
Pliers
Pliers help hold small parts and pull the old string out. They give you a better grip on tight areas.
Needle-nose pliers work well because they fit into small spaces easily.
- Needle-nose pliers for precision grip
- Regular pliers for stronger grip
Replacement Pull String
You need a new pull string that matches your mower’s original size and type. Using the wrong size can cause problems.
Check your mower manual or measure the old string to buy the correct replacement.
- Diameter size usually ranges from 1/8 to 3/16 inch
- Choose nylon or polyester for durability
Wrench Or Socket Set
A wrench or socket set helps remove bolts that hold the starter assembly. This is important to access the pull string area.
Use the correct size tool to avoid rounding off bolts.
- Adjustable wrench for various bolt sizes
- Socket set with common sizes (e.g., 10mm, 13mm)
Work Gloves
Wear work gloves to protect your hands from sharp mower parts. Gloves also improve grip on tools and parts.
Choose gloves that fit well and allow good hand movement.
- Leather gloves for protection
- Rubber-coated gloves for better grip
Credit: www.familyhandyman.com
Safety Precautions
Changing a pull string on a lawn mower requires careful attention. Safety should be your first priority. Always follow these guidelines to avoid accidents.
Before starting the repair, ensure the mower is off and unplugged. This prevents accidental starting, which could cause injury.
Wear Protective Gear
Always wear gloves to protect your hands from sharp parts. Safety glasses are also essential to shield your eyes from debris.
- Use thick gloves to avoid cuts
- Wear safety glasses to protect your eyes
Disconnect The Spark Plug
Disconnecting the spark plug stops the engine from starting accidentally. This step is crucial for your safety.
- Locate the spark plug wire
- Pull the wire off the spark plug carefully
Work In A Safe Area
Choose a clean and flat workspace. This helps you keep track of parts and tools while avoiding trips and falls.
- Clear the area of clutter
- Ensure the surface is flat and stable
Use Proper Tools
Using the right tools makes the job easier and safer. Improper tools can slip and cause injury.
- Use a screwdriver set appropriate for your mower
- Keep tools organized and within reach
Removing The Old Pull String
Changing the pull string on your lawn mower starts with removing the old one. This task keeps your mower ready for use.
Follow these steps carefully to access the pull starter and detach the old rope safely.
Accessing The Pull Starter
First, turn off the lawn mower and disconnect the spark plug wire. This stops the engine from starting accidentally.
Next, locate the pull starter on the mower's engine. It usually looks like a round cover with a handle.
- Remove any screws holding the pull starter cover in place.
- Lift off the cover carefully to expose the rope and pulley system.
- Keep the screws safe to reattach the cover later.
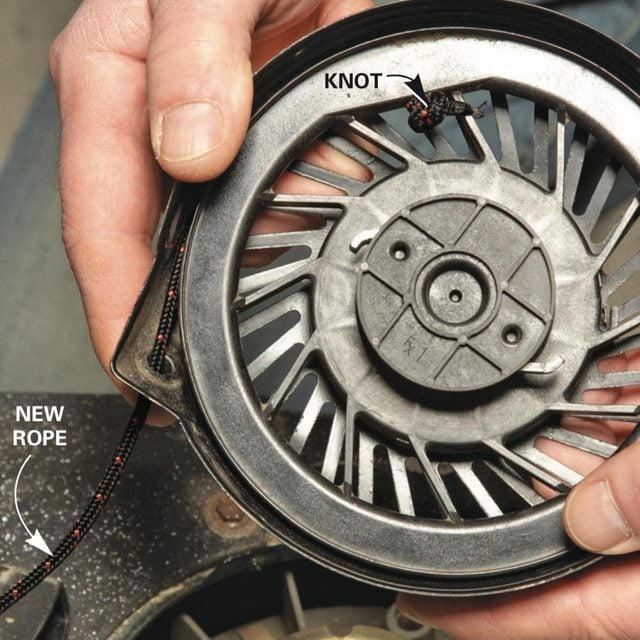
Detaching The Old Rope
Once you see the rope, check how it is attached to the pulley. It is often tied or secured with a knot.
| Action | Details |
|---|---|
| Untie Knot | Loosen the knot holding the rope to the pulley. |
| Remove Rope | Pull the old rope out of the pulley hole gently. |
| Check Pulley | Inspect the pulley for damage before installing new rope. |
If the rope is stuck, carefully use pliers to help loosen it. Avoid damaging the pulley or starter mechanism.

Credit: www.youtube.com
Measuring And Cutting The New String
Replacing the pull string on a lawn mower requires the right length of string. Measuring and cutting the new string carefully ensures smooth operation.
Using a string that is too long or too short can cause problems. Follow these steps to get the perfect fit for your mower.
Measure The Old String Length
Start by measuring the old pull string. If the string is broken or missing, check your lawn mower’s manual for the correct length.
- Pull out the old string completely.
- Use a tape measure to find its full length.
- Write down this measurement for reference.
Choose The Right String Diameter
Use a string with the same thickness as the original. Too thick or too thin string may not work well.
| String Diameter | Common Lawn Mower Models |
| 1/8 inch (3.2 mm) | Most residential mowers |
| 3/32 inch (2.4 mm) | Lightweight or small mowers |
| 5/32 inch (4 mm) | Heavy-duty or commercial mowers |
Cut The String To The Proper Length
Use sharp scissors or a utility knife to cut the string. Make sure the cut is clean to avoid fraying.
- Double-check the length against your measurement.
- Cut the string slightly longer if unsure; you can trim later.
- Keep the string straight while cutting to get an accurate length.
Prepare The Ends Of The String
Some strings need their ends melted or taped to prevent unraveling. Check your mower’s instructions for details.
Here is a quick tip for preventing frayed ends:
- Lightly melt the ends with a lighter for nylon strings.
- Wrap ends with clear tape for extra hold.
Installing The New Pull String
Changing the pull string on your lawn mower is simple with the right steps. Installing the new rope properly ensures your mower starts smoothly.
This guide covers how to thread the rope and tie knots securely for the best results.
Threading The Rope Through The Starter
Start by feeding one end of the new pull string through the hole in the starter pulley. Pull it through slowly to avoid tangles.
- Insert the rope through the pulley hole until you see a few inches on the other side.
- Wind the rope around the pulley in the direction the pulley turns.
- Keep the rope tight as you wrap it to prevent slipping.
- Leave enough rope length outside the starter housing for pulling.
Tying Secure Knots
Tying strong knots at the rope ends stops the string from slipping out. Use simple knots that hold well under tension.
| Knot Type | Description | Why Use It |
|---|---|---|
| Overhand Knot | A basic knot that forms a simple loop. | Easy to tie and keeps the rope from slipping. |
| Figure Eight Knot | A knot shaped like the number eight. | Stronger than the overhand knot and less likely to slip. |
| Double Knot | Two overhand knots tied in sequence. | Extra security for the rope ends under tension. |

Credit: www.youtube.com
Reassembling The Starter
After replacing the pull string, you need to put the starter back together. This process ensures the mower will start properly next time.
Take your time to align all parts carefully. A small mistake can cause the starter to fail or the rope to jam.
Positioning The Recoil Spring
Place the recoil spring back into its slot inside the starter housing. Make sure it lies flat and does not overlap.
Winding The Pull Cord
Attach the new pull cord to the pulley. Pull the cord slowly to wind the spring tight. Do not force it, or the spring may break.
- Thread the cord through the pulley hole.
- Tie a strong knot at the end of the cord.
- Wind the cord around the pulley in the correct direction.
- Hold tension on the cord while winding the spring.
- Check that the cord retracts smoothly.
Reattaching The Starter Assembly
Once the cord is wound, place the starter assembly back on the engine. Align the holes and insert the screws to secure it.
| Part | Action |
| Starter Housing | Align with engine mounts |
| Screws | Tighten evenly to avoid warping |
| Pull Cord Handle | Check for easy grip and movement |
Testing The New Pull String
After replacing the pull string on your lawn mower, it is important to test it carefully. Testing ensures the string works smoothly and starts the engine properly.
Proper testing can help you find any issues early and fix them before using the mower in the yard.
Check The String Tension
Pull the new string slowly to feel its tension. It should be tight enough to turn the engine but not too hard to pull. A loose string will not start the mower.
Test The Recoil Mechanism
Pull the string several times to see if it recoils back smoothly. The recoil should be quick and complete so the string is ready for the next pull.
Start The Engine
Pull the string with a steady force to start the engine. If the mower starts easily, the string installation is correct. If it does not start, check for problems.
Troubleshooting Common Issues
- The string does not pull out fully: Check for knots or obstructions in the spool.
- The string does not recoil: Inspect the recoil spring for damage or misalignment.
- The engine does not start: Make sure the string is attached to the starter mechanism properly.
| Issue | Possible Cause | Solution |
|---|---|---|
| String too loose | Incorrect winding or length | Rewind string tightly and cut to correct length |
| String does not recoil | Broken recoil spring | Replace the recoil spring |
| Engine fails to start | Improper string attachment | Reattach string securely to the starter pulley |
Tips For Maintenance
Keeping your lawn mower in good shape helps it work longer. Changing the pull string is a key part of this.
Here are some tips to keep your pull string and mower ready for use.
Check The Pull String Regularly
Look at the pull string before each use. If you see frays or tears, change it soon. A worn string can break unexpectedly.
Checking often saves time and avoids mower problems during work.
Use The Right String Type
Choose a pull string made for lawn mowers. It should be strong and fit the reel properly. Avoid using thin or weak strings.
Using the correct string helps the mower start easily and lasts longer.
Keep The Reel Clean
Dirt and grass can build up in the pull string reel. Clean it with a brush or cloth before adding a new string. This stops jams and helps the string move smoothly.
Lubricate Moving Parts
Apply light oil to the reel's moving parts. This reduces friction and wear. Do this after cleaning and before fitting the new string.
- Use oil made for small machines
- Wipe off extra oil to avoid dirt build-up
- Repeat lubrication every few months
Store Your Mower Properly
Keep your mower in a dry place when not in use. Moisture can damage the pull string and other parts. Cover the mower to protect it from dust and rain.
Good storage extends the life of the pull string and mower.
Frequently Asked Questions
How Do I Know When To Change A Lawn Mower Pull String?
A pull string needs replacement if it frays, snaps, or won’t rewind. Regular wear causes it to weaken, affecting mower starting.
What Tools Are Required To Replace A Pull String?
You need a screwdriver, replacement pull cord, pliers, and possibly gloves. These tools help safely remove and install the new string.
Can I Use Any Pull String For My Mower?
Use the manufacturer’s recommended cord size and type. Using the wrong string can cause poor performance or damage.
How Long Does It Take To Change A Pull String?
Replacing a pull string typically takes 15 to 30 minutes. Time varies based on mower model and your experience.
Conclusion
Changing a pull string on a lawn mower is simple and quick. Follow the steps carefully to avoid mistakes. Use the right tools and a good replacement string. Take your time to thread the string properly. This keeps your mower ready for any lawn job.
Regular maintenance helps your mower last longer. Now, you can fix the pull string yourself with ease. Enjoy a smooth start every time you mow.