Are you tired of dealing with hard water problems like spots on your dishes, dry skin, or clogged pipes? Installing a water softener might be the solution you’ve been looking for.
But you might be wondering—how hard is it to install a water softener yourself? Is it something you can handle over a weekend, or will you need to call a pro? You’ll discover exactly what’s involved in the installation process, what tools you’ll need, and how much effort it really takes.
By the end, you’ll know if this project is within your reach—and how to get started right away. Keep reading to unlock the secrets to softer water and easier installation!

Credit: plumbsmart-tx.com
Assessing Water Hardness
Water hardness affects how well a water softener works. It is important to know how hard your water is before installation. This helps you choose the right system and set it correctly.
Hard water contains minerals like calcium and magnesium. These minerals cause scale buildup in pipes and reduce soap effectiveness. Testing water quality is the first step to understanding hardness.
Testing Your Water Quality
You can test your water hardness in several ways. You may use home test kits or send samples to a lab. Knowing the exact hardness helps in installing the correct water softener.
- Purchase a water hardness test kit from a store.
- Collect a water sample in a clean container.
- Follow the test kit instructions carefully.
- Compare your results with the hardness scale.
- Consider lab testing for more accurate results.
Identifying Signs Of Hard Water
You can spot hard water by observing your home and water usage. These signs show the presence of minerals that a water softener can remove.
| Sign | Description |
| Soap Scum | White residue on sinks and tubs |
| Spotty Dishes | Water spots on glasses and silverware |
| Dry Skin | Itchy or flaky skin after bathing |
| Scale Buildup | Hard deposits on pipes and appliances |
| Reduced Soap Lather | Soap does not foam well with hard water |
Choosing The Right Water Softener
Installing a water softener can make your home water supply cleaner. Choosing the right one is important. It depends on your needs and home size.
Understanding the types and features of water softeners will help you make a good choice. This guide covers the basics.
Types Of Water Softeners
Water softeners come in different types. Each has its own benefits and uses. Knowing these helps you decide.
- Salt-based ion exchange softeners: Common and effective.
- Salt-free water softeners: Use potassium chloride instead of salt.
- Dual-tank water softeners: Ideal for large families.
- Magnetic water softeners: Attach to pipes, no plumbing changes needed.
Sizing Your System
The size of the water softener matters. It should match your household's water use. This ensures efficient operation.
| Household Size | Grain Capacity |
| 1-2 people | 24,000-32,000 grains |
| 3-4 people | 32,000-40,000 grains |
| 5+ people | 40,000-60,000 grains |
Key Features To Consider
Look for features that add value and convenience. These make your water softener more user-friendly.
- Regeneration controls: Timer or sensor-based options.
- Bypass valve: Allows easy maintenance and repairs.
- Capacity and efficiency: Check how much water it can soften.
- Warranty: Longer warranties offer peace of mind.
Tools And Materials Needed
Installing a water softener needs the right tools and materials. Having these ready makes the job easier and faster.
This guide lists the basic tools and plumbing items you will need for a smooth installation.
Essential Installation Tools
You will need some common tools to install a water softener. These help you connect pipes and secure parts.
- Adjustable wrench
- Pipe cutter or hacksaw
- Teflon tape
- Phillips and flathead screwdrivers
- Bucket to catch water
- Measuring tape
- Level tool
- Safety gloves
Required Plumbing Materials
Along with tools, you need specific plumbing materials to fit the water softener into your pipes.
| Material | Description |
| Bypass valve kit | Allows water to bypass the softener during maintenance |
| Pipe fittings | Connects the softener to your home plumbing |
| Flexible tubing | Connects the softener to drain and water supply |
| Drain hose | Directs wastewater to a drain or outside |
| Salt pellets or potassium chloride | Used to regenerate the softener resin |
| Plumber’s putty or sealant | Prevents leaks at joints and connections |
Preparing For Installation
Installing a water softener needs careful preparation. This helps the process go smoothly and safely.
You must know where to place the unit, how to stop the water, and how to clear the pipes.
Locating The Installation Site
Choose a spot near the main water line. It should be easy to reach and have space for the softener and salt storage.
- Find a dry and level area
- Avoid places with direct sunlight
- Ensure there is a nearby electrical outlet
- Check for easy access to drain pipes
Shutting Off Water Supply
Turn off the main water valve before installing. This stops water flow and prevents leaks during work.
| Valve Type | Location | Action |
| Gate Valve | Near water meter | Turn clockwise to close |
| Ball Valve | By main pipe | Turn handle 90 degrees |
| Lever Valve | In basement or crawl space | Flip lever to off |
Draining Existing Pipes
Drain water left in the pipes to avoid spills. Open faucets to let water run out fully.
- Open the lowest faucet in your home
- Open the highest faucet to let air in
- Wait for water to stop flowing
- Close the faucets before starting installation
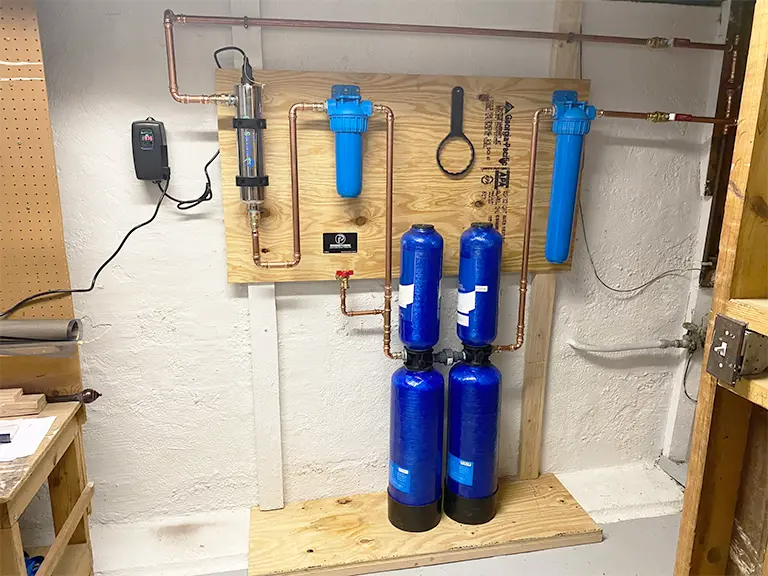
Step-by-step Installation Process
Installing a water softener can seem tough, but it is doable with clear steps. This guide explains each part of the process.
Follow these steps carefully to set up your water softener correctly and ensure it works well.
Connecting The Bypass Valve
The bypass valve lets you stop water flow to the softener without shutting off your whole system. It helps during maintenance.
Attach the bypass valve to the main water line where the softener will connect. Make sure all parts fit tightly to avoid leaks.
- Turn off the main water supply before starting.
- Use pipe cutter to open the line where you want to install.
- Connect the bypass valve using the included fittings.
- Tighten connections with a wrench but do not overtighten.
Installing The Resin Tank
The resin tank holds the beads that soften your water. Place it near the bypass valve for easy access.
Attach the resin tank to the bypass valve using the supplied tubing or connectors. Check for any gaps or loose parts.
- Position the tank on a stable, level surface.
- Connect the inlet and outlet ports to the bypass valve.
- Use plumber’s tape on threaded fittings to prevent leaks.
- Ensure the tank is upright and secure.
Setting Up The Brine Tank
The brine tank holds salt and water to regenerate the resin beads. Place it close to the resin tank but not touching.
Connect the brine tank to the resin tank with the brine line. Add the recommended amount of salt and fill with water.
- Put the brine tank on a flat surface near the resin tank.
- Attach the brine line securely between tanks.
- Fill the tank with salt as per your softener’s instructions.
- Add water to the brine tank but do not overfill.
Hooking Up The Drain Line
The drain line removes waste water during the cleaning cycle. Connect it to the resin tank’s drain outlet.
Run the drain line to a proper drain or outside area. Keep it raised to prevent backflow and secure it in place.
- Use flexible tubing supplied with the unit.
- Connect one end to the resin tank drain port.
- Route the line to a drain, keeping it above water level.
- Secure tubing with clamps to avoid movement.
Programming The Control Valve
The control valve manages the water softener’s timing and regeneration. Set it according to your water hardness and usage.
Use the control panel buttons to enter settings. Follow the manual to input hardness level and time of day.
- Turn on the power to the control valve.
- Set the current time on the display.
- Enter your water hardness number.
- Choose regeneration frequency based on your water use.
- Save settings and start the softener.

Credit: www.familyhandyman.com
Common Installation Challenges
Installing a water softener can be tricky for many homeowners. Some tasks need careful attention to avoid problems.
Knowing common challenges helps you prepare and avoid mistakes during installation.
Dealing With Plumbing Obstacles
Plumbing is one of the hardest parts of installing a water softener. Pipes may not fit the softener’s connectors.
Old pipes can be rusty or fragile, making installation risky. You might need extra tools or parts to join pipes.
- Check pipe size before starting
- Use pipe cutters for clean cuts
- Seal connections with plumber’s tape
- Replace damaged pipes if needed
Handling Electrical Connections
Some water softeners need electricity to work. Connecting the power safely is important to avoid shocks or damage.
Make sure the power outlet is near and grounded. Follow the manufacturer’s instructions for wiring and avoid overloading circuits.
- Use a grounded outlet
- Turn off power before wiring
- Check for water near electrical parts
- Use waterproof covers if needed
Avoiding Water Leaks
Leaks cause damage and reduce water softener efficiency. Tight seals and proper fittings help stop leaks.
Test all connections after installation. Watch for drips or wet spots around pipes and valves.
- Tighten all fittings but avoid over-tightening
- Use plumber’s tape on threaded joints
- Inspect valves for proper closure
- Check the drain line for secure placement
Testing And Maintenance Tips
Installing a water softener is only part of the process. Testing and regular maintenance keep it working well. Proper care extends the life of the unit and improves water quality.
This guide covers how to check performance, clean the system, refill salt, and fix common problems. These tips help you maintain a smooth-running water softener.
Checking Water Softener Performance
Test your water softener regularly to ensure it removes hardness properly. Use a water hardness test kit from a store or online. Test water before and after softening for comparison.
- Collect water samples at two points: before and after the softener.
- Use test strips or liquid kits to measure hardness levels.
- Compare results to check if the softener reduces hardness effectively.
- Record the readings to track performance over time.
- Test every 3 to 6 months for best results.
Routine Cleaning And Salt Refills
Cleaning your water softener and refilling salt keeps it working smoothly. Salt helps remove hard minerals from water. Check the salt level monthly and add more if needed.
| Maintenance Task | Frequency | Details |
| Check Salt Level | Monthly | Keep salt above water level to avoid bridging |
| Clean Brine Tank | Yearly | Remove buildup and sludge inside tank |
| Inspect Resin Bed | Every 2 Years | Replace resin if softening drops |
| Clean Venturi Valve | Every 6 Months | Clear blockages for proper water flow |
Troubleshooting Common Issues
Some issues are easy to fix yourself. Identify the problem and try these solutions before calling a professional. Keep your water softener running well with simple troubleshooting.
- Soft water not coming out: Check salt level and add if low.
- Salt bridge formed: Break the hardened salt crust inside the tank.
- Water tastes salty: Reduce salt dosage or check for leaks.
- Unit not regenerating: Reset timer or check electrical connections.
- Water pressure drops: Clean the venturi valve and check for clogs.

Credit: www.reddit.com
When To Call A Professional
Installing a water softener can be simple or hard. Some jobs need a pro to avoid trouble.
Knowing when to call a professional helps keep your home safe and your softener working well.
Complex Plumbing Systems
Homes with many pipes or unusual layouts can make softener installation tricky. A pro knows how to handle this.
They can connect your softener without causing leaks or pressure problems in your plumbing.
Electrical Safety Concerns
Some water softeners need electricity to run. This can be risky if you are not sure about wiring.
Professionals follow safety rules and prevent electrical shocks or damage during installation.
Warranty And Support Benefits
Many water softeners come with warranties that require professional installation. Doing it yourself might void it.
Experts also provide support if problems arise after installation. This saves time and money.
Frequently Asked Questions
How Difficult Is It To Install A Water Softener?
Installing a water softener is moderately challenging. Basic plumbing skills and tools are needed. Clear instructions make the process easier. Professional help is recommended for complex setups.
What Tools Are Required For Water Softener Installation?
You need wrenches, pipe cutters, Teflon tape, and a screwdriver. A bucket and tubing may also be useful. Having all tools ready speeds up installation.
How Long Does Water Softener Installation Take?
Installation usually takes 2 to 4 hours. Time varies depending on system complexity and plumbing skill. Preparation and reading instructions help reduce installation time.
Can I Install A Water Softener Myself?
Yes, with basic plumbing knowledge, you can install it. Follow manufacturer instructions carefully. If unsure, hiring a professional ensures proper setup and avoids damage.
Conclusion
Installing a water softener can be a simple or tricky task. It depends on your plumbing skills and tools. Basic setups take a few hours with clear instructions. Complex systems may need professional help to avoid mistakes. Proper installation saves money and improves water quality.
Take your time and follow steps carefully. A soft water system benefits your home in many ways. Small effort now prevents big problems later. Consider your comfort level before starting the project.